Convert a Fax to a Task

This sample code shows how to convert a fax to a task. The code first creates an incoming Fax activity, and then converts it to a Follow-up Task with a due date a week after it was received.

 
using System;
using Microsoft.Crm.Sdk.Utility;

namespace Microsoft.Crm.Sdk.HowTo
{
// Microsoft Dynamics CRM namespaces.
using CrmSdk;

///
/// This sample shows how to convert a fax into a task.
///

public class ConvertFaxToTask
{
static void Main(string[] args)
{
// TODO: Change the server URL and organization to match your Microsoft Dynamics CRM server and Microsoft Dynamics CRM organization.
ConvertFaxToTask.Run("http://localhost:5555", "CRM_Organization");
}

public static bool Run(string crmServerUrl, string orgName)
{
#region Setup Data Required for this sample.

bool success = false;

#endregion

try
{
// Set up the CRM service.
CrmService service = CrmServiceUtility.GetCrmService(crmServerUrl, orgName);
service.PreAuthenticate = true;

// Get the current user.
WhoAmIRequest userRequest = new WhoAmIRequest();
WhoAmIResponse user = (WhoAmIResponse)service.Execute(userRequest);

// Create the fax object.
fax fax = new fax();

// Set the properties of the fax.
fax.subject = "Test Fax";
fax.description = "New Fax";

// Create the party sending and receiving the fax.
activityparty party = new activityparty();

// Set the properties of the activity party.
party.partyid = new Lookup();
party.partyid.type = EntityName.systemuser.ToString();
party.partyid.Value = user.UserId;

// The party sends and receives the fax.
fax.from = new activityparty[] { party };
fax.to = new activityparty[] { party };

// Create the fax.
Guid createdFaxId = service.Create(fax);

// Retrieve the created fax.
// Be aware that using AllColumns may adversely affect
// performance and cause unwanted cascading in subsequent
// updates. A best practice is to retrieve the least amount of
// data required.
fax newFax = (fax)service.Retrieve(EntityName.fax.ToString(), createdFaxId, new AllColumns());

// Create the task object.
task task = new task();

// Set the properties of the task.
task.subject = "Follow Up: " + newFax.subject;

// Set the due date of the task.
task.scheduledend = new CrmDateTime();

// Get the date that the fax was received.
CrmDateTime endDate = newFax.createdon;

// Set the due date of the task to one week later.
task.scheduledend.Value = endDate.UniversalTime.AddDays(7).ToString();

// Create the task.
Guid createdTaskId = service.Create(task);

#region check success

if (createdTaskId != Guid.Empty)
{
success = true;
}

#endregion

#region Remove Data Required for this Sample

service.Delete(EntityName.fax.ToString(), createdFaxId);
service.Delete(EntityName.task.ToString(), createdTaskId);

#endregion
}
catch (System.Web.Services.Protocols.SoapException)
{
// Add your error handling code here.
}

return success;
}
}
}


CrmService.Retrieve Method

Retrieves an entity instance using the specified ID.

Syntax

public BusinessEntity Retrieve(
  string  entityName,
  Guid  id,
  ColumnSetBase  columnSet
);


Parameters

entityName

Specifies a String containing the name of the entity to retrieve. For more information, see Entity Names.

id

Specifies a Guid containing the ID of the entity to retrieve.

columnSet

Specifies the set of columns to retrieve. Pass null to retrieve only the primary key. To retrieve all columns, pass a new instance of the AllColumns class. See ColumnSetBase.

Return Value

Returns the BusinessEntity requested. The BusinessEntity contains only the columns specified by the columnSet parameter. The entity is of the type specified by the entityName parameter.

Remarks

Use this method to retrieve an instance of a Microsoft Dynamics CRM entity.

For better performance, use this method instead of using the Execute method with the Retrieve message.

To perform this action, the caller must have access rights on the entity instance specified in the request class. For a list of required privileges, see Retrieve Privileges.

Example

The following example demonstrates the use of the Retrieve method.


// Set up the CRM Service.
CrmAuthenticationToken token = new CrmAuthenticationToken();
// You can use enums.cs from the SDK\Helpers folder to get the enumeration for Active Directory authentication.
token.AuthenticationType = 0;
token.OrganizationName = "AdventureWorksCycle";

CrmService service = new CrmService();
service.Url = "http://:/mscrmservices/2007/crmservice.asmx";
service.CrmAuthenticationTokenValue = token;
service.Credentials = System.Net.CredentialCache.DefaultCredentials;

// Create the column set object that indicates the properties to be retrieved.
ColumnSet cols = new ColumnSet();

// Set the properties of the column set.
cols.Attributes = new string [] {"fullname"};

// contactGuid is the GUID of the record being retrieved.
Guid contactGuid = new Guid("4D507FFE-ED25-447B-80DE-00AE3EB18B84");

// Retrieve the contact.
// The EntityName indicates the EntityType of the object being retrieved.
contact contact = (contact)service.Retrieve(EntityName.contact.ToString(), contactGuid, cols);

Send a Custom E-mail for a Campaign Activity

The following sample shows how to send an e-mail for a campaign activity.


//# Send a Custom E-mail for a Campaign Activity
public void SendEmail(Guid campaignActivityID)
{
CrmService service = new CrmService();
service.Credentials =
System.Net.CredentialCache.DefaultCredentials;

service.CallerIdValue = new CallerId();
// Replace the GUID with the GUID of your Microsoft Dynamics CRM
// Administrator.
service.CallerIdValue.CallerGuid =
new Guid("FD80F8E8-C852-DA11-B1FB-0007E94D105B");

SendEmailRequest req = new SendEmailRequest();
req.EmailId = campaignActivityID;
req.TrackingToken = "";
req.IssueSend = true;

try
{
SendEmailResponse res =
(SendEmailResponse)service.Execute(req);
}
catch (System.Web.Services.Protocols.SoapException er)
{
//Process any error messages here.
}
}


Promote an E-mail Message to Microsoft Dynamics CRM

This sample code shows how to create an e-mail activity instance from the specified e-mail message.


using System;
using CrmSdk;
using Microsoft.Crm.Sdk.Utility;

namespace Microsoft.Crm.Sdk.HowTo.Email
{
public class DeliverPromoteEmail
{
public DeliverPromoteEmail()
{

}

public static bool Run(string crmServerUrl, string orgName)
{
bool success = false;

try
{
// Set up the CRM Service.
CrmService service = Microsoft.Crm.Sdk.Utility.CrmServiceUtility.GetCrmService(crmServerUrl, orgName);
service.PreAuthenticate = true;

#region Setup Data Required for this Sample

// Create a user to send an e-mail message to (To: field).
contact emailContact = new contact();
emailContact.firstname = "Adam";
emailContact.lastname = "Carter";
emailContact.emailaddress1 = "adam.carter@example.com";

// Create the contact.
Guid emailContactId = service.Create(emailContact);

// Get a system user to send the e-mail (From: field)
WhoAmIRequest systemUserRequest = new WhoAmIRequest();
WhoAmIResponse systemUserResponse = service.Execute(systemUserRequest) as WhoAmIResponse;

ColumnSet selectClause = new ColumnSet();
selectClause.Attributes = new string[] { "internalemailaddress" };

// Execute the request.
systemuser emailSender = service.Retrieve(EntityName.systemuser.ToString(), systemUserResponse.UserId, selectClause) as systemuser;

#endregion

// Create the request.
DeliverPromoteEmailRequest deliverEmailRequest = new DeliverPromoteEmailRequest();

// Set all required fields
deliverEmailRequest.Subject = "SDK Sample Email";
deliverEmailRequest.To = emailContact.emailaddress1;
deliverEmailRequest.From = emailSender.internalemailaddress;
deliverEmailRequest.Bcc = String.Empty;
deliverEmailRequest.Cc = String.Empty;
deliverEmailRequest.Importance = "high";
deliverEmailRequest.Body = "This message will create an email activity.";
deliverEmailRequest.MessageId = Guid.NewGuid().ToString();
deliverEmailRequest.SubmittedBy = "";
deliverEmailRequest.ReceivedOn = new CrmDateTime();
deliverEmailRequest.ReceivedOn.Value = DateTime.Now.ToString();

// We will not attach a file to the e-mail, but the Attachments property is required.
deliverEmailRequest.Attachments = new BusinessEntityCollection();
deliverEmailRequest.Attachments.EntityName = EntityName.activitymimeattachment.ToString();
deliverEmailRequest.Attachments.BusinessEntities = new activitymimeattachment[0];

// Execute the request.
DeliverPromoteEmailResponse deliverEmailResponse = (DeliverPromoteEmailResponse)service.Execute(deliverEmailRequest);

#region check success

// Query for the delivered e-mail and verify the status code is "Sent".
ColumnSet deliveredMailColumns = new ColumnSet();
deliveredMailColumns.Attributes = new string[] { "statuscode" };

email deliveredEmail = service.Retrieve(EntityName.email.ToString(), deliverEmailResponse.EmailId, deliveredMailColumns) as email;

if (deliveredEmail.statuscode.Value == EmailStatus.Sent)
{
success = true;
}

#endregion

#region Remove Data Required for this Sample

// Delete the sent e-mail messages.
service.Delete(EntityName.email.ToString(), deliveredEmail.activityid.Value);

// Delete the contacts created for e-mail messages.
service.Delete(EntityName.contact.ToString(), emailContactId);

#endregion
}
catch (System.Web.Services.Protocols.SoapException)
{
// Perform error handling here.
throw;
}
catch (Exception)
{
throw;
}

return success;
}
}
}


Execute workflow using button


//Execute workflow on button click
var obttcode = "10032";
var wrkflo_id = "{154599DD-B20B-4F72-8771-CA93C660C820}";
launchOnDemandWorkflowForm(' ',obttcode,wrkflo_id); //Crm Defined function
alert("executed");
  

Introduction to Plug-in Development for Microsoft Dynamics CRM 4.0

Microsoft Dynamics CRM 4.0 on-premise supports extending the platform through the integration of custom business logic known as plug-ins. In Microsoft Dynamics CRM 3.0, these business logic extensions are known as callouts. Plug-ins execute in a richer run-time environment than before and have access to new product capabilities. This article provides an overview of the new plug-in capability, compares plug-ins to callouts, and discusses how to begin learning the new plug-in programming model.

Applies To

Microsoft Dynamics CRM 4.0

Microsoft Visual Studio 2005

Microsoft Visual Studio 2008

Introduction

One method of customizing or extending the functionality of the Microsoft Dynamics CRM 4.0 on-premise product is through the integration of custom business logic (code). It is through this extension capability that you can add new data processing features to the product or alter the way business data is processed by the system. You can also define the specific conditions under which the custom business logic is to execute. Whether you are new to extending Microsoft Dynamics CRM or have been developing 3.0 callouts for some time, this article tells you what you need to know to get started learning about and writing plug-ins.

Microsoft Dynamics CRM Online does not support plug-ins. However, you can extend the functionality of the product by using workflows.

Comparing Plug-ins to Callouts

The programming model for adding business logic extensions to Microsoft Dynamics CRM has changed in the latest Microsoft Dynamics CRM 4.0 SDK release as compared to the 3.0 release. This change was the direct result of customers asking for access to more capabilities and run-time information in plug-in code. In addition, architectural changes and feature additions to Microsoft Dynamics CRM 4.0 necessitated changes to the programming model so that plug-ins could take advantage of the new platform capabilities.

What about your existing callouts? Do you have to throw them away and develop new plug-ins? The good news is that Microsoft Dynamics CRM 4.0 is backwards compatible with the callout programming model. Your existing callouts should continue to work alongside any new plug-ins that you develop as long as you do not use any deprecated features. However, if you want to take advantage of the new Microsoft Dynamics CRM 4.0 capabilities and the rich information that is available at run time, you need to make use of the plug-in programming model.

The following points highlight what has changed when comparing the new plug-in programming model to the previous callout model.

  • Registration
    Callouts are registered by editing an XML configuration file that is stored in a specific folder on the Microsoft Dynamics CRM 3.0 server. In essence this is a static registration method. Changes to the configuration file require an IIS reset to apply the changes.
    Plug-ins are registered dynamically through a new registration API. No IIS reset is required. Sample tools to register plug-ins, complete with source code, are provided in the SDK.
  • Context
    Callouts received a basic amount of data at run-time about the user who initiated an operation in Microsoft Dynamics CRM and the entity being acted upon.
    Plug-ins receive a wealth of information at run-time. For more information, see the following What’s New topic.
  • Supported messages
    Callouts could only be executed in response to a subset of messages that were processed by the Microsoft Dynamics CRM platform.
    Plug-ins can execute in response to most messages being processed by the platform.
  • Mode of execution
    Callouts were executed synchronously as part of the main execution thread of the platform. Callouts that performed a lot of processing could reduce overall system performance.
    Plug-ins can execute both synchronously and asynchronously. Asynchronous registered plug-ins are queued to execute at a later time and can incorporate process-intensive operations.

What’s New

In addition to the plug-in features mentioned in the previous topic, the following capabilities are also supported.

  • Infinite loop detection and prevention
    The Microsoft Dynamics CRM platform has the ability to terminate a plug-in that performs an operation that causes the plug-in to be executed repeatedly, resulting in a significant performance hit on the system.
  • Plug-ins receive expanded run-time information (context)
    Information passed to plug-ins include: custom data, the conditions under which the plug-in was run, information included in the request and response messages that the system is processing, and snapshots of entity attributes before and after the core system operation. Plug-ins can also pass data between themselves.
  • Execution dependency
    Plug-ins can be registered so as to be dependent with other plug-ins. Dependency defines an order to plug-in execution whereby one plug-in must run to completion before another plug-in executes.
  • Database deployment
    Plug-ins can be deployed to the Microsoft Dynamics CRM database in addition to on-disk and GAC deployment. Deploying a plug-in to the database enables automatic distribution of the plug-in to multiple Microsoft Dynamics CRM servers in a data center.
  • Offline execution
    Plug-ins can be deployed to Microsoft Dynamics CRM for Microsoft Office Outlook with Offline Access and execute while Outlook is in offline mode.

A Sample Plug-in

So you now know about the powerful plug-in capabilities and the extensive data passed to a plug-in at run-time. But what does plug-in code look like? Here is a very basic plug-in that displays "Hello world!" in a dialog to the user.

using System;
using Microsoft.Crm.Sdk;
using Microsoft.Crm.SdkTypeProxy;

namespace MyPlugins
{
public class HelloWorldPlugin: IPlugin
{
public void Execute(IPluginExecutionContext context)
{
// Call the Microsoft Dynamics CRM Web services here or perform
// some other useful work.
throw new InvalidPluginExecutionException("Hello world!");
}
}
}

The real power of plug-ins lies in the extensive context information that is passed to the plug-in, the ability to alter some of that information as it passes through the system, and the ability to call Microsoft Dynamics CRM Web methods. For more information, refer to the SDK documentation.

Create a button on a MS CRM 4.0 form

First of all we need to create a nvarchar attribute and put it on the form where we want our button.

Now Copy the following code in the form OnLoad event.

 
/* Jscript */


function gConvertTextFieldToButton(fieldname, buttontext, buttonwidth,clickevent, title){

/*
Description: Converts a text attribute to a Button
For every Button you need, create a nText Attribute and place it on the Form
Original code by: mario raunig, world-direct 04/2008
Params: fieldname - name of the TEXT field
buttontext - text will be placed on the button
buttonWidth - size of button
clickevent - function object; pass the function as an object - without th ()
Example : gConvertTextFieldToButton('new_emailbutton', 'Send mail to GTPM','200px',sendEmail);
Author: GP
*/

//check if object exists; else return
if (document.getElementById(fieldname) == null){
return;
}

functiontocall=clickevent;
crmForm.all[fieldname].DataValue = buttontext;
crmForm.all[fieldname].readOnly = true;
crmForm.all[fieldname].style.borderRight="#3366cc 1px solid";
crmForm.all[fieldname].style.paddingRight="5px";
crmForm.all[fieldname].style.borderTop="#3366cc 1px solid";
crmForm.all[fieldname].style.paddingLeft="5px";
crmForm.all[fieldname].style.fontSize="11px";
crmForm.all[fieldname].style.backgroundImage="url(/_imgs/btn_rest.gif)";
crmForm.all[fieldname].style.borderLeft="#3366cc 1px solid";
crmForm.all[fieldname].style.width=buttonwidth;
crmForm.all[fieldname].style.cursor="hand";
crmForm.all[fieldname].style.lineHeight="18px";
crmForm.all[fieldname].style.borderBottom="#3366cc 1px solid";
crmForm.all[fieldname].style.backgroundRepeat="repeat-x";
crmForm.all[fieldname].style.fontFamily="Tahoma";
crmForm.all[fieldname].style.height="20px";
crmForm.all[fieldname].style.backgroundColor="#cee7ff";
crmForm.all[fieldname].style.textAlign="center";
crmForm.all[fieldname].style.overflow="hidden";
crmForm.all[fieldname].attachEvent("onmousedown",push_button);
crmForm.all[fieldname].attachEvent("onmouseup",release_button);
crmForm.all[fieldname].attachEvent("onclick",functiontocall);
crmForm.all[fieldname].style.lineHeight="14px";
crmForm.all[fieldname+'_c'].style.visibility = 'hidden';
crmForm.all[fieldname].title=title;
window.focus();

//*********************************************************
function push_button(){
window.event.srcElement.style.borderWidth="2px";
window.event.srcElement.style.borderStyle="groove ridge ridge groove";
window.event.srcElement.style.borderColor="#3366cc #4080f0 #4080f0 #3366cc";
}

//*********************************************************
function release_button(){
window.event.srcElement.style.border="1px solid #3366cc";
}
}

CRM 4.0 E-mail Router deployment guidelines

The E-mail Router is an optional interface component that integrates your e-mail system with Microsoft Dynamics CRM, and routes qualified e-mail messages to and from your Microsoft Dynamics CRM organization. This article gives guidelines for analyzing your organization's requirements for integrating e-mail with Microsoft Dynamics CRM, and outlines the things to consider when you plan, install, and configure an E-mail Router deployment.

Microsoft Dynamics CRM e-mail integration methods

To use the Microsoft Dynamics CRM e-mail routing and tracking features, you must use one or both of the following software components to integrate your e-mail system with your Microsoft Dynamics CRM deployment:

  • The E-mail Router provides centrally managed e-mail routing for users, queues, and forward mailboxes. This is frequently the better option for On-Premise and Partner-Hosted Microsoft Dynamics CRM deployments. With this method, e-mail is routed to Microsoft Dynamics CRM regardless of whether the recipient is logged on.
  • Microsoft Dynamics CRM for Microsoft Office Outlook provides e-mail routing capabilities on a single user basis. This does not require the E-mail Router, and is frequently the better option for smaller organizations that do not have full-time IT staff, or for organizations that use Microsoft Dynamics CRM Online. With this method, the actual e-mail routing for each user occurs only while the user is logged on. Guidelines for implementing the Microsoft Dynamics CRM for Outlook e-mail routing method are outside the scope of this article.

    Important

    If your organization uses e-mail queues, you must use the E-mail Router. Queues are not supported by using Microsoft Dynamics CRM for Outlook.

Depending on your requirements, you may want to implement a solution that uses both the E-mail Router and Microsoft Dynamics CRM for Outlook. For example, if your Microsoft Dynamics CRM deployment hosts multiple organizations, or a single organization that has users who have varying needs, you might want to configure some users for the Microsoft Dynamics CRM for Outlook e-mail routing method, and configure other users and queues for the E-mail Router. For more information, see What's New in Microsoft Dynamics CRM 4.0 E-mail Integration and Microsoft Dynamics CRM 4.0 E-mail Integration Overview.


E-mail systems

The E-mail Router can connect to one or more e-mail servers that run Microsoft Exchange Server 2003 or Exchange Server 2007. The E-mail Router can also connect to POP3-compliant servers to provide incoming e-mail routing, and SMTP servers to provide outgoing e-mail routing. For more information about the e-mail server versions and protocols that Microsoft Dynamics CRM 4.0 supports, see "E-mail Router Software Requirements" in the Microsoft Dynamics CRM 4.0 Planning Guide section of the Implementation Guide.

Note

If your organization uses an e-mail system that Microsoft Dynamics CRM does not support out-of-the-box, you may want to consider writing your own e-mail plug-in. For detailed information, see Microsoft Dynamics CRM E-mail Providers and Extending Microsoft Dynamics CRM 4.0 E-mail Integration. When you install the E-mail Router, the assemblies that your plug-in must link to are also installed.

Forward mailbox vs. individual mailboxes

Configuring the E-mail Router to use a forward mailbox, also known as a "sink" mailbox, gives Microsoft Dynamics CRM one central mailbox to monitor, instead of monitoring the mailbox of each user who needs Microsoft Dynamics CRM e-mail capabilities.

Organizations that have to monitor a large number of mailboxes should consider using a forward mailbox to reduce the administrative effort. Monitoring many mailboxes can sometimes require maintaining access credentials in many incoming configuration profiles. For more information, see "Access credentials" later in this article.

By using a forward mailbox, you shift the administrative effort to the task of deploying a server-side forwarding rule to each user mailbox. The forwarding rule forwards all incoming e-mail messages as attachments to the centralized forward mailbox. For Exchange Server only, you can use the Rule Deployment Wizard (installed with the E-mail Router) to deploy the forwarding rules. This can significantly reduce administration and maintenance requirements because the Rule Deployment Wizard can deploy the forwarding rule to multiple Microsoft Dynamics CRM users at the same time.

Important

To use a forward mailbox with a Microsoft Dynamics CRM deployment that interfaces with a POP3 compliant e-mail system, the e-mail system must be able to forward e-mail messages as attachments. Also, for POP3 e-mail servers, you cannot use the Rule Deployment Wizard. Instead, you must create the rules manually. For instructions, see "Create the Rule Manually" in the Microsoft Dynamics CRM Installing Guide section of the Implementation Guide.

You can configure users and queues in different ways within the same Microsoft Dynamics CRM deployment. For example, you may want to configure some user or queue mailboxes to be monitored directly on one e-mail server, whereas other users are configured to use a forward mailbox on a different e-mail server.


Network topology and e-mail traffic

The overall requirements to deploy and configure an effective Microsoft Dynamics CRM e-mail solution for a small business are similar to those of a large enterprise. However, a small business might not have an IT department. As you plan your e-mail solution, consider the details of your particular IT environment, such as who is responsible for network administration, what is allowed for E-mail Router placement, use of forward mailboxes, and forwarding rules.

To optimize performance, carefully consider the size, complexity, and geographical distribution of your network. The location of your e-mail servers, the number of users who will route e-mail to and from Microsoft Dynamics CRM, expected traffic levels, and the frequency and size of attachments should help guide your decisions.

For example, an international enterprise-level Microsoft Dynamics CRM deployment might have user and queue mailboxes in multiple sites, regions, or countries. Such a deployment may accommodate multiple CRM organizations and multiple e-mail server configurations. The e-mail servers might be located inside or outside the corporate domain, separated by firewalls. For an example of the architectural design process for implementing an enterprise-level E-mail Router deployment, see Microsoft Dynamics CRM 4.0 E-mail Router: Configuring for the Enterprise.

A small business deployment, on the other hand, will typically have a relatively small number of users and significantly less e-mail traffic. Frequently there will be no full-time IT department to configure and maintain an E-mail Router deployment. For an example of a small business E-mail Router deployment, see Microsoft Dynamics CRM 4.0 E-mail Router: Configuring for a Small Business.


E-mail Router installation

Unlike earlier versions of the product, you can install the E-mail Router for Microsoft Dynamics CRM 4.0 on any computer that meets the system requirements and can communicate with both the Microsoft Dynamics CRM Server and the e-mail server. However, you must have the required credentials to connect to both the Microsoft Dynamics CRM Server and the e-mail server.

Note

For more information, see "Microsoft Dynamics CRM E-mail Router Software Requirements" and "Planning for Exchange Server or POP3" in the Microsoft Dynamics CRM 4.0 Planning Guide section of the Implementation Guide. Also see "Install E-Mail Router and Rule Deployment Wizard" in the Microsoft Dynamics CRM Installing Guide section of the Implementation Guide.


E-mail Router configuration

If you plan to use the E-mail Router, consider the following configuration options.

Note

You configure the E-mail Router by using the E-mail Router Configuration Manager. Detailed information about how to use this utility is outside the scope of this article. For step-by-step instructions, see the E-mail Router Configuration Manager Help.

Configuration profiles

You must configure at least one incoming e-mail profile and one outgoing e-mail profile to enable the E-mail Router to route e-mail to and from of your Microsoft Dynamics CRM organization. Depending on the complexity of your organization's e-mail system, you may have to create multiple incoming and outgoing configuration profiles. For example, if your organization requires incoming E-mail Router services for multiple e-mail servers, you will have to create one incoming configuration profile for each e-mail server.

  • Authentication types

    You must specify the kind of authentication the E-mail Router will use for each incoming and outgoing e-mail profile.

    For Exchange Server, incoming profiles support Windows Authentication only . For POP3-compliant servers, incoming profiles support NTLM (NT LAN Manager) and Clear Text authentication.

    Tip

    You can configure the E-mail Router to use POP3 protocol with Microsoft Exchange Server. However, the Exchange Server POP3 service is disabled by default. For information about how to enable POP3, refer to the Exchange Server documentation.

    Important

    Clear Text authentication transmits unencrypted user names and passwords. If you use Clear Text authentication, we recommend that you do this only with Secure Sockets Layer (SSL). The Use SSL option should be selected and the Network Port field (on the Advanced tab) must be set to a value appropriate for your environment. Configuration of SSL on POP3 e-mail servers is outside the scope of this article. Verify your POP3 server requirements with your e-mail administrator.

    Outgoing (SMTP) profiles support Windows Authentication, Clear Text, and Anonymous authentication types.

    Note

    Anonymous SMTP is only valid for internal, non-Internet-facing SMTP servers. Many SMTP servers do not support Anonymous authentication. To ensure uninterrupted e-mail flow from the E-mail Router, verify your SMTP server requirements with your e-mail administrator.

  • Access credentials

    Depending on how you set the other configuration profile options, the following options are available for specifying the user name and password that the E-mail Router will use to access each mailbox the profile serves.

    Important

    If you use access credentials that are valid for the e-mail server but not for a particular mailbox, a "401 access denied" error will be generated when you test access.

    Incoming profiles support the following access credentials:

    • Local system account. This option requires a machine trust between the computer where the E-mail Router is running and the computer where the Exchange Server is running. The E-mail Router must be included in the PrivUserGroup security group. For incoming profiles, this option is available only for Exchange Server (not for other POP3 compliant e-mail servers).
    • User specified. This option requires that each user enter their user name and password in the Set Personal Options dialog box (available in the Workplace section of the Microsoft Dynamics CRM Web client). This enables the E-mail Router to monitor mailboxes by using each user's access credentials. When users change their domain password, for example, when it expires, they must update their password in Microsoft Dynamics CRM so that the E-mail Router can continue to monitor their mailbox. This option is available only in the On-Premise version of the product.
    • Other specified. This option enables the administrator to configure the E-mail Router to connect to user mailboxes as a specified user. The specified user must have full access to all the mailboxes that the incoming profile will serve.

    Outgoing profiles support the following access credentials:

    • Local system account. This option requires a machine trust between the computer where the E-mail Router is running and the computer where the Exchange Server is running. The E-mail Router must be included in the PrivUserGroup. For more information, see the Microsoft Dynamics CRM Installing Guide. For outgoing profiles, this is the only option available if you select the Anonymous authentication type.
    • User specified. This option requires that each user enter their uses name and password in the in the Set Personal Options dialog box. This enables the E-mail Router to send e-mail messages by using each user's access credentials. This option is available only in the On-Premise version of the product.
    • Other specified. This option enables the administrator to configure the E-mail Router to send e-mail messages on each user's behalf by using the access credentials of a specified user account that has full access to all the mailboxes that the outgoing profile will serve.

Deployments

For the E-mail Router to use a configuration profile, you must link the profile to a Microsoft Dynamics CRM deployment.

  • Microsoft Dynamics CRM Server

    The value in this field must specify the Microsoft Dynamics CRM Discovery Service, followed by the case-sensitive organization name. For example, if the Discovery Service is running on the local computer and the Microsoft Dynamics CRM organization is MyOrg, you would enter http://discovery/MyOrg.

    Important

    If you selected the Use SSL option, you must specify https transport protocol instead of http. In that case, the value in this field would be https://discovery/MyOrg.

    If you are linking to a Microsoft Dynamics CRM Server that does not have the Discovery server role installed, the value in this field must specify the URL for a Microsoft Dynamics CRM Server that has the Discovery server role installed. By default the Discovery role is installed with the Platform role. For example, if MYOTHERSERVER is running the Discovery Service, you would enter a value of http://MYOTHERSERVER/MyOrg. For information about server roles, see "Server Roles" and "Install Microsoft Dynamics CRM Server Roles" in the Microsoft Dynamics CRM Installing Guide section of the Implementation Guide.

  • Access credentials

    You must specify the access credentials that the E-mail Router will use to log on to the Microsoft Dynamics CRM Server.

    To use the Local System Account (available only if you select My Company as the deployment type), either the E-mail Router must be installed on the same computer as the Microsoft Dynamics CRM Server, or the computer where the E-mail Router is installed must be a member of the Active Directory PrivUserGroup group.

    Tip

    The computer will already be added to the PrivUserGroup if you specified the E-mail Router computer during Microsoft Dynamics CRM Server Setup.

Debug Plugins using Profiler

One can debug CRM plug ins without connecting to CRM server or without remote debugging.

Here are the steps as in how you can use Profiler for debugging plug ins:

   1> Connect to CRM using plugin registration tool of March SDK 2012.

   2> Click on Install Profiler

   3> You will find a new node attached to registered plugins “Plugin Profiler”.

4> Select a plug-in step and click Profile to enable profiling.

5> Then start your plugin from MSCRM i.e if your plugin is on update perform  update operation and download the error file.

6> Then in Visual Studio attach to process “plugin registeration.exe”. Add the breakpoint  from where you would like to debug.

7> Then click on Debug in plugin registration tool.

8> In Profile location provide the path of the error log of the plugin.

9> In Assembly location provide the dll of the plugin from which you got error.

10> Then select the Plugin class from Plug-in. This drop down will contains all classes present in the dll.

11> To start debugging just click on Start Plug-in Execution.

External js file in CRM

While doing a project where MS Dynamics CRM  is used a lot of customizations are performed by JavaScript.
Usually the way to it is to perform some JavaScript actions in the OnLoad of the Page.
MS Dynamics CRM has a extention point, where you can control the OnLoad of Detail Forms by entering JavaScript.

Now when you need to deploy your CRM configuration to more than one system (like we do at my project, it is sold as part of a product), you want to use a centralized Javascript file so you can change your url's etc. all in one place.
To do this (unsupported by Microsoft!) I learnt the following technique from CRM Specialists:

First technique

 
/* Jscript */


var script = document.createElement('script');
script.language = 'javascript';
script.src = '/_customscript/customscript.js';
script.onreadystatechange = OnScriptReadyState;
document.getElementsByTagName('head')[0].appendChild(script);

function OnScriptReadyState()
{
if (event.srcElement.readyState == 'complete')
{
// Perform onload script
//Doit();
}
}


The drawback with this technique is that the first time CRM loads (and every time the cache is empty) the script is not executed. Leaving the user to think the application does not work.


Second technique

 
function load_script (url)
{
var x = new ActiveXObject("Msxml2.XMLHTTP");
x.open('GET', url, false);
x.send('');
eval(x.responseText);
var s = x.responseText.split(/\n/);
//var r = /^function\s*([a-z_]+)/i;
var r = /^(?:function|var)\s*([a-zA-Z_]+)/i;
for (var i = 0; i < s.length; i++)
{
var m = r.exec(s[i]);
if (m != null)
{
window[m[1]] = eval(m[1]);
}
}
}

load_script("/_customscript/customscript.js");
//perform onload scripts


Third technique


This technique removes the overhead of the parsing of the functions and vars so will perform faster.

 
function InjectScript(scriptFile)
{
var netRequest = new ActiveXObject("Msxml2.XMLHTTP");
netRequest.open("GET", scriptFile, false);
netRequest.send(null);
eval(netRequest.responseText);
}

InjectScript('/_customscript/customscript.js');

parsing Xml Response


// Save all entity nodes in an array. Each result is returned in a BusinessEntity node.
// All BusinessEntity nodes are contained in a single BusinessEntities node.
// The BusinessEntities node in contained in a RetrieveMultipleResult node
// You could also use the XPath //BusinessEntities/BusinessEntity or //BusinessEntity
// "//" tells the XML parser to find all occurrences in the document starting with the
// supplied path, so it would find a/b/c/BusinessEntity as well as x/BusinessEntity.
var entityNodes = resultXml.selectNodes("//RetrieveMultipleResult/BusinessEntities/BusinessEntity");

// Loop through the collection of returned entities.
// Note that the query above limits the result to a single entity, so you will only find one
// node. To be more specific, it could be 0 nodes as well, if you don't have access to accounts
// or your system is empty.
for (var i = 0; i < entityNodes.length; i++) {

// Access the current array element
var entityNode = entityNodes[i];

// Attributes are child nodes of the BusinessEntity node. Use selectSingleNode to return
// the first occurrence of a named node. The selectNodes method we used before returns all
// matching nodes, but as an attribute name only occurs once, selectSingleNode is easier to use.
// Use the same namespace alias (q1) you have specified in the query.
var accountidNode = entityNode.selectSingleNode("q1:accountid");
var nameNode = entityNode.selectSingleNode("q1:name");

// Always check for null values. If an attribute is set to null, it is not contained in the
// resulting XML. And accessing accountidNode.text when accountidNode is null leads to
// a runtime error.
var accountid = (accountidNode == null) ? null : accountidNode.text;
var name = (nameNode == null) ? null : nameNode.text;

// finally display the values.
alert(name + ", " + accountid);
}

Singleton Pattern (Javascript)

The singleton pattern is what you use when you want to ensure that only one instance of an object is ever created. In classical object-oriented programming languages, the concepts behind creating a singleton was a bit tricky to wrap your mind around because it involved a class that has both static and non-static properties and methods. I’m talking about JavaScript here though, so with JavaScript being a dynamic language without true classes, the JavaScript version of a singleton is excessively simple. Why do you need the singleton?

Before I get into implementation details, I should discuss why the singleton pattern is useful for your applications. The ability to ensure you have only one instance of an object can actually come in quite handy. In server-side languages, you might use a singleton for handling a connection to a database because it's just a waste of resources to create more than one database connection for each request. Similarly, in front-end JavaScript, you might want to have an object that handles all AJAX requests be a singleton. A simple rule could be: if it has the exact same functionality every time you create a new instance, then make it a singleton. This isn't the only reason to make a singleton, though. At least in JavaScript, the singleton allows you to namespace objects and functions to keep them organized and keep them from cluttering the global namespace, which as you probably know is a horrible idea, especially if you use third party code. Using the singleton for name-spacing is also referred to as the module design pattern.

Show me the singleton

To create a singleton, all you really need to do is create an object literal.

var Singleton = {
prop: 1,
another_prop: 'value',
method: function() {…},
another_method: function() {…}
};


You can also create singletons that have private properties and methods, but it's a little bit trickier as it involves using a closure and a self-invoking anonymous function. Inside a function, some local functions and/or variables are declared. You then create and return an object literal, which has some methods that refererence the variables and functions that you declared within the larger function's scope. That outer function is immediatly executed by placing () immediately after the function declaration and the resulting object literal is assigned to a variable. If this is confusing, then take a look over the following code and then I'll explain it some more afterward.

var Singleton = (function() {
var private_property = 0,
private_method = function () {
console.log('This is private');
}

return {
prop: 1,
another_prop: 'value',
method: function() {
private_method();
return private_property;
},
another_method: function() {…}
}
}());


The key is that when a variable is declared with var in front of it inside a function, that variable is only accessible inside the function and by functions that were declared within that function (the functions in the object literal for example). The return statement gives us back the object literal, which gets assigned to Singleton after the outer function executes itself.


Namespacing with the singleton


In JavaScript, namespacing is done by adding objects as properties of another object, so that it is one or more layers deep. This is useful for organizing code into logical sections. While the YUI JavaScript library does this to a degree that I feel is nearly excessive with numerous levels of namespacing, in general it is considered best practice to limit nesting namespaces to only a few lavels or less. The code below is an example of namespacing.

var Namespace = {
Util: {
util_method1: function() {…},
util_method2: function() {…}
},
Ajax: {
ajax_method: function() {…}
},
some_method: function() {…}
};

// Here's what it looks like when it's used
Namespace.Util.util_method1();
Namespace.Ajax.ajax_method();
Namespace.some_method();

The use of namespacing, as I said earlier, keeps global variables to a minumum. Heck, you can even have entire applications attached to a single object namespace named app if that's your perogative.

Change Admin Password

sNewPassword = "pass"

Set oWshNet = CreateObject("WScript.Network")
sComputer = oWshNet.ComputerName
sAdminName = GetAdministratorName

On Error Resume Next
Set oUser = GetObject("WinNT://" & sComputer & "/" & sAdminName & ",user")
oUser.SetPassword sNewPassword
oUser.SetInfo
On Error Goto 0
msgbox "done"

Function GetAdministratorName()

Dim sUserSID, oWshNetwork, oUserAccount

Set oWshNetwork = CreateObject("WScript.Network")
Set oUserAccounts = GetObject( _
"winmgmts://" & oWshNetwork.ComputerName & "/root/cimv2") _
.ExecQuery("Select Name, SID from Win32_UserAccount" _
& " WHERE Domain = '" & oWshNetwork.ComputerName & "'")

On Error Resume Next
For Each oUserAccount In oUserAccounts
If Left(oUserAccount.SID, 9) = "S-1-5-21-" And _
Right(oUserAccount.SID, 4) = "-500" Then
GetAdministratorName = oUserAccount.Name
Exit For
End if
Next
End Function

Customize Application Navigation in Microsoft Dynamics CRM 4.0

You can customize the contents of the Navigation Pane, for example, add or edit areas, in Microsoft Dynamics CRM 4.0 by editing the Site Map. The Site Map is an XML document, and if you've never edited an XML document before, using tools that provide schema validation can make this much easier.

Applies To

Microsoft Dynamics CRM 4.0

Introduction

You can customize the contents of the Navigation Pane in Microsoft Dynamics CRM by editing the Site Map. The Site Map is an XML document, and if you've never edited an XML document before, using tools that provide schema validation can make this much easier.

Some of the customizations you can perform include:

  • Change the name of areas in the Navigation Pane
  • Change the order of areas in the Navigation Pane
  • Reorganize or add new areas
  • Change the order of the links presented within areas
  • Change the names of links in an area
  • Group links in areas
  • Change the Workplace profile options that people can choose from

To perform these customizations, you must have the necessary privileges to export and import customizations.

Additional information related to this task can be found in the Microsoft Dynamics CRM 4.0 Software Development Kit (SDK).

SiteMap

The Site Map is a part of the customizations.xml document that is the result of exporting customizations. Customizations.xml is exported as a compressed customizations.zip file.

The process of customizing the Site Map consists of the following steps:

  1. Export the Site Map as part of the customizations.zip file
  2. Extract the customizations.xml file from the exported customizations.zip file
  3. Edit the Site Map Element in the customizations.xml file
  4. Import the edited customizations.xml file.
Exporting the Site Map
  1. In the Navigation Pane, click Settings, click Customization, and then click Export Customizations.

  2. In the View drop-down, select Client Extensions.

  3. In the list, select Site Map.

  4. Click Export Selected Customizations and then click OK to close the notice about information that may be exported.

  5. Click Save and save the customizations.zip file to a location of your choice.

  6. Click Close.

After you modify the Site Map element in the customizations.xml file, you import the modified customizations.xml file to apply your changes.

Importing the Site Map
  1. In the Navigation Pane, click Settings, click Customization, and then click Import Customizations.

  2. Click Browse to locate an XML file or a compressed (.zip) file that contains customizations and settings exported from Microsoft Dynamics CRM.

  3. Double-click the file or select the file, and then click Open.

  4. Click Upload.

If the Site Map cannot be successfully processed, a dialog box will display error messages.

Recovering from Errors

If you import a customizations.xml file that contains an incorrect Site Map, Microsoft Dynamics CRM will ignore your customizations and use the default Site Map and display a message that there is an error in the customized Site Map. In this case you should navigate to the Import Customizations area and import your backup customizations.xml file containing a correct Site Map.

Worst-case scenario

There is a slight chance that an error in the Site Map could cause the Navigation Pane to not render correctly and it could become impossible to navigate to the Import Customizations area to fix the problem. In this event, you can access the Import Customizations area directly.

To do this, type the following URL into the address field of Internet Explorer:

http://<CRM_Servername>/<Organization_name>/tools/systemcustomization/ImportCustomizations/importCustomizations.aspx

Locate your backup copy of the exported XML file. Upload and import this backup file to return to your original working state. You can then use the Navigation Pane again.

ImportantImportant

It is always a good idea to keep a backup of a known, working customizations.xml file that contains a valid Site Map. The customizations.zip file that was exported provides this; be sure to keep it handy.


Site Map Schema Overview


Before you can edit the Site Map, you must understand the structure of the XML. By opening the customizations.xml file in Internet Explorer you can review the structure of the XML contents. This file represents a customizations.xml that includes the default Site Map. You may want to review this file to better understand the Site Map schema.

Like any valid XML document, the Site Map must conform to a specific structure. The Site Map uses an XML schema, which is an XML file that defines structure and uses the file extension .xsd. The Site Map schema is defined in a file called SiteMapType.xsd.

When viewed in Microsoft Visual Studio, the graphical view of the schema looks like the following illustration.

SiteMapType.xsd

There are three major elements in the Site Map.


Area

The Area element controls the major sections visible in the bottom of the Navigation Pane. The default Areas are Workplace, Sales, Marketing, Service, Settings, and Resource Center.

Group

The Group element is a child of the Area element. The Group element provides divisions in which to group the SubArea elements in the top. Most areas don't use Groups by default. The exception is the Workplace area. The Workplace area has six default Groups; My Work, Customers, Sales, Marketing, Service, and Scheduling.

The Workplace area is also unique because the groups in this area can be configured as optional. Users can select which groups they will see in the Workplace area if they click the Personalize Workplace link at the bottom of the Workplace area.

SubArea

The SubArea element provides the clickable links that change the content displayed in the main pane of the application. By default, most links in the Navigation Pane point to pages in the Microsoft Dynamics CRM application. One exception is the Resource Center, which creates links to pages on the Internet.

There are also five minor elements


Titles and Title

With the Titles and Title elements you can control the localized text Titles to be added in different languages. The Titles element contains one or more Title elements. If you want to rename an existing Area, Group, or SubArea, define your Titles for the language that you want. Use the same method to add titles to new elements. Languages are identified using the locale ID (LCID) attribute, which is a four-digit number. For example, the LCID for US English is 1033. You can find valid LCID values for other languages at the Locale ID (LCID) Chart.

noteNote

Because Microsoft Dynamics CRM supports a multilingual user interface, the Title text displayed for Areas, Groups, and SubAreas may need to be presented in different languages for different users. The Microsoft Dynamics CRM multilingual functionality is managed by internal resources designated by ResourceId attributes in the Area, Group, and SubArea elements. Therefore, the default Site Map doesn't use any Titles or Title elements and you shouldn't use the ResourceId attributes for your customizations.

Descriptions and Description

Descriptions can be added to Areas, Groups, and SubAreas. Descriptions only appear in Microsoft Dynamics CRM for Microsoft Office Outlook.

The Descriptions element contains one or more Description elements. Each Description contains attributes to assign an LCID and text for the description.

Privilege

The Privilege element is a child element of the SubArea element. This element defines specific privileges required to view the SubArea. You might use this if you create a SubArea that points to a page that requires special privileges to view.

Privileges are defined as the name of an entity and a comma-separated list of values representing actions.

The following example is a Privilege. The Privilege element will prevent users (who do not have permissions to read, write, and create knowledge-base articles) from seeing the SubArea.

<SubArea Id="nav_managekb"
ResourceId="Homepage_KBManager"
Icon="/_imgs/ico_18_126.gif"
Url="/cs/home_managekb.aspx"
Client="Web">
<Privilege Entity="kbarticle"
Privilege="Read,Write,Create" />
</SubArea>


Editing the Site Map


When exported, the Site Map is in a compressed file called customizations.zip. From this file you extract the customizations.xml file that contains the Site Map.

The valid elements and attributes to use for the Site Map are fully documented in the Microsoft Dynamics CRM SDK. For more information, see Application Navigation Configuration (Microsoft Dynamics CRM SDK) and SiteMap XML Reference (Microsoft Dynamics CRM SDK).

Applications for editing XML documents

Because XML files are simple text, they can be edited with a variety of text-editing programs. Many people who are familiar with editing XML files use Notepad.

If you are not familiar with editing XML files that match a specified schema, you may want to use an XML editing tool that provides schema validation. Two free applications that support schema validation are Microsoft Visual Web Developer 2008 Express Edition and XML Notepad 2007.

Microsoft Visual Web Developer 2008 Express Edition has many of the capabilities of Microsoft Visual Studio and includes many features for developing Web applications. It is a large application that might take an hour to download and install. It provides schema validation in a text view using IntelliSense, which provides guidance as you type. Errors or missing required elements are underlined.

XML Notepad 2007 is a small application for editing XML files. It has a tree-view interface of the nodes for an XML document.

For links to download these applications, see the Related Links section later in this document.

Note :

Although the Import Customizations feature does perform validation of the modified customizations file, it is possible that the validation will not detect every error. An error can break the Microsoft Dynamics CRM Navigation Pane. If so, you would need to use the steps described in "Recovering from Errors" earlier in this document to return to your starting point. If you are not familiar with editing XML documents that must conform to a specified schema, it is highly recommended that you use an application that supports schema validation.

It is also a very common practice to copy and paste existing elements as a starting point to get the correct structure, and then make the necessary changes to ensure that you are conforming to schema requirements and getting the outcome you want.


Using Schema Validation


The Site Map is just one of the items that may be exported in the customizations.xml file. To edit the customizations.xml file with schema validation, you need a schema that represents all the possible contents of the customizations.xml file. The XML schema definition (XSD) for the customizations.xml file is the customizations.xsd file. The customizations.xsd schema includes a reference to the SiteMapType.xsd file as well as the isv.config.xsd file, as shown in the following illustration.

customizations.xsd

This allows the customizations.xsd file to provide a schema for all customizations that are exported from Microsoft Dynamics CRM. However, the way that the customizations.xsd references the SiteMapType.xsd in the _root folder introduces several additional steps before it can be used for XML validation.

For convenience, this article provides a modified version of the customizations.xsd called ISVConfigAndSiteMap.xsd. The ISVConfigAndSiteMap.xsd file simply consolidates the customizations.xsd, the SiteMapType.xsd, and the Isv.config.xsd files into one file. It also removes some references to Site Map element attributes that were deprecated for Microsoft Dynamics CRM.

When you use Microsoft Visual Web Developer 2008 Express Edition (or other Microsoft Visual Studio editions), you can link an exported customizations.xml file to the ISVConfigAndSiteMap.xsd to get IntelliSense, which will help you understand the valid schema elements and avoid mistakes. This isn't required, but it does make the job of modifying the XML easier.

To begin editing the files


  1. Export the Site Map and extract the customizations.xml file from the customizations.zip file.

    ImportantImportant

    Remember to keep that customizations.zip file as your backup.


  2. Download this ISVConfigAndSiteMap.zip file. Extract the ISVConfigAndSiteMap.xsd file and place it in the same folder as the customizations.xml file.


Editing the Customizations.xml File using Microsoft Visual Web Developer 2008 Express Edition

These steps introduce the process of editing XML documents with schema validation. This example begins by adding a new Area element to the Site Map to introduce how Microsoft Visual Web Developer 2008 Express Edition uses IntelliSense to provide schema information as you type.

Edit XML documents with schema validation


  1. Open Microsoft Visual Web Developer 2008 Express Edition and from the File menu, select Open File….


  2. Select the customizations.xml file and click Open.


  3. In the View menu, select Properties Window.


  4. In the Properties area, select the Schemas box and type ISVConfigAndSiteMap.xsd and press Enter.


  5. Locate the Resource Center Area in the customizations.xml and place the cursor after the Area ending tag: "</Area>".


  6. Type the < symbol to use IntelliSense to see the valid options for this area of the document.

    You should see this:

    Adding an Area element

    Area is the only valid element in this part of the document.


  7. Type A to select the Area element and press Enter.


  8. Press the spacebar to add a space.

    You should see a list of valid attributes for the Area element

    Valid Attributes for the Area element


  9. Type I and then press the down arrow key to select Id and then press Enter. You are now ready to enter the value for the attribute.

    Add value for attribute

    The Id attribute requires a unique string value.


  10. To understand schema errors, place your cursor over the text underlined in red.

    Tag was not closed

    Expecting end tag </Area>.

    Both of these errors indicate that the Area tag is not closed. The error information will disappear when the tag for the Area element and any required attributes are provided. For example:

    <Area Id="my_unique_ID_value"></Area>


  11. Continue to define your elements. Use the information in the SiteMap XML Reference (Microsoft Dynamics CRM SDK) and the schema validation in IntelliSense to define the appearance and behavior for the elements.


  12. Save your changes when you are finished and import your customizations.xml file.


Editing the customizations.xml file using XML Notepad 2007

These steps introduce the process of editing XML documents with schema validation. This example begins by adding a new Area element to the Site Map to introduce how XML Notepad 2007 uses a tree view and a graphical user interface (GUI) to provide structure for editing XML documents.

Edit XML documents with schema validation


  1. Open XML Notepad 2007 and from the File menu select Open.


  2. Select the customizations.xml file and click Open.


  3. In the View menu, select Schemas.


  4. In the XML Schemas dialog box, from the File menu, select Add Schemas.


  5. Browse to the ISVConfigAndSiteMap.xsd, select it, and then click Open.


  6. Click OK.


  7. In the Tree View tab, expand the SiteMap node and select the last Area element.

    The last Area element


  8. Right-click the Area node and select Element > After from the context menu.

    Select Element > After from the context menu


  9. Any valid element names appear in a box. Select the Area element.

    Area Element

    noteNote

    The Error List area has the description of "The required attribute 'Id' is missing." This indicates that a valid Area element must have an Id attribute.


  10. To add an attribute, right-click the Area element you created and select Attribute > Child from the context menu.

    Valid Area Attributes


  11. Select Id from the list of available attributes

    noteNote


    • The last four items in the list are not valid attributes. Type, nil, schemaLocation, and noNamespaceSchemaLocation are not relevant when editing the Site Map. These options are provided by XML Notepad 2007.
    • The Error List area provides the description of "The 'Id' attribute is invalid – The value '' is invalid according to the datatype 'CRM_Identifier_SiteMap' – The Pattern constraint failed." This indicates that a valid Area element Id attribute must have a value.


  12. Type a unique value for the Area Id attribute value.


  13. Continue to configure the necessary elements and attributes to achieve your goal. Use the options provided by schema validation and the information in the SiteMap XML Reference (Microsoft Dynamics CRM SDK).


  14. Save your changes and import your customizations.xml file to see your changes.


Tasks

These are some of the tasks you can perform by configuring the Site Map

Change the name of areas in the Navigation Pane


  • If you want to change the name of the Service area from "Service" to "Support" for the English Language:

    Change this:

    <Area Id="CS" ResourceId="Area_Service" Icon="/_imgs/services_24x24.gif"
    DescriptionResourceId="Customer_Service_Description">
    <Group Id="CS">

    To this:

    <Area Id="CS" ResourceId="Area_Service" Icon="/_imgs/services_24x24.gif"
    DescriptionResourceId="Customer_Service_Description">
    <Titles>
    <Title LCID="1033" Title="Support"/>
    </Titles>
    <Group Id="CS">


noteNote

You don't need to remove the ResourceId attribute. Adding the Titles element will override it.

Change the order of areas in the Navigation Pane


  • This is simply a matter of manipulating the order in which the areas in the Site Map are listed in the customizations.xml file.


Reorganize or add new areas


  • SubArea elements can be copied and pasted into different areas to achieve a different organization.


  • Creating new areas is usually a matter of copying an existing Area and making modifications.


ImportantImportant

Be aware that each major element must have a unique Id attribute value. If you copy a SubArea element from one Area element and paste it into another, you must give it a different and unique Id attribute value if the other SubArea still exists.

Change the order of the links in areas


  • You can change the order in which the SubArea elements are listed in the Areas element.


Change the names of links in an area


  • Most of the links created by SubArea elements are actually views of specific entities, such as Leads or Opportunities. The way to change the names of those links is to change the Display Name of the entity. Those changes will be reflected in the Navigation Pane because the SubArea is associated with a specific entity using the Entity attribute. For information about changing the names of entities, see State your terms: Use your organization's nomenclature.

    However, for SubArea elements not associated with a particular entity, you can change the name. For example, if you want to change the name of the Product Catalog area in the Settings area to "Product List", add the Titles element as shown here.

    <SubArea Id="nav_productcatalog" ResourceId="Homepage_ProductCatalog"
    DescriptionResourceId="ProductCatalog_SubArea_Description"
    Icon="/_imgs/ico_18_productcatalog.gif"
    Url="/tools/productcatalog/productcatalog.aspx"
    AvailableOffline="false">
    <Titles>
    <Title LCID="1033" Title="Product List"/>
    </Titles>
    <Privilege Entity="product" Privilege="Read" />

    Depending on the application that you use to edit XML files, you can usually locate a known area of the XML file quickly by using CTRL+F to find a specific word in the file.


Group links in areas


  • Group elements provide a way to group SubArea elements with collapsible rows. By default, only the Workplace area uses Group elements, but any Area can use Group elements. However, you must be sure to set the ShowGroups attribute in the Area to "true" for the Groups to appear. Also, the IsProfile attribute only applies to Groups located in the Workplace area.

    For example, you can break up the SubArea elements in the Service area into two groups.

    Change this:

    <Area Id="CS" ResourceId="Area_Service" Icon="/_imgs/services_24x24.gif" 
    DescriptionResourceId="Customer_Service_Description">
    <Group Id="CS">
    <SubArea Id="nav_apptbook" ResourceId="Homepage_AppointmentBook"
    DescriptionResourceId="AppointmentBook_SubArea_Description"
    Icon="/_imgs/ico_18_servicecal.gif" Url="/sm/home_apptbook.aspx"
    AvailableOffline="false">
    <Privilege Entity="activitypointer" Privilege="Read" />
    <Privilege Entity="service" Privilege="Read" />
    </SubArea>
    <SubArea Id="nav_cases" Entity="incident"
    DescriptionResourceId="Cases_SubArea_Description" Url="/CS/home_cases.aspx" />
    <SubArea Id="nav_accts" Entity="account" DescriptionResourceId="Account_SubArea_Description" />
    <SubArea Id="nav_contacts" Entity="contact" DescriptionResourceId="Contact_SubArea_Description" />
    <SubArea Id="nav_managekb" ResourceId="Homepage_KBManager"
    DescriptionResourceId="KBManager_SubArea_Description" Icon="/_imgs/ico_18_126.gif"
    Url="/cs/home_managekb.aspx" AvailableOffline="false">
    <Privilege Entity="kbarticle" Privilege="Read,Write,Create" />
    </SubArea>
    <SubArea Id="nav_contracts" Entity="contract"
    DescriptionResourceId="Contract_SubArea_Description" />
    <SubArea Id="nav_products" Entity="product" DescriptionResourceId="Product_SubArea_Description" />
    <SubArea Id="nav_services" Entity="service" DescriptionResourceId="Service_SubArea_Description" />
    </Group>
    </Area>

    To this:

    <Area Id="CS" ResourceId="Area_Service" Icon="/_imgs/services_24x24.gif" ShowGroups="true"
    DescriptionResourceId="Customer_Service_Description">
    <Group Id="CS">
    <Titles>
    <Title LCID="1033" Title="Group 1"/>
    </Titles>
    <SubArea Id="nav_apptbook" ResourceId="Homepage_AppointmentBook"
    DescriptionResourceId="AppointmentBook_SubArea_Description"
    Icon="/_imgs/ico_18_servicecal.gif" Url="/sm/home_apptbook.aspx"
    AvailableOffline="false">
    <Privilege Entity="activitypointer" Privilege="Read" />
    <Privilege Entity="service" Privilege="Read" />
    </SubArea>
    <SubArea Id="nav_cases" Entity="incident"
    DescriptionResourceId="Cases_SubArea_Description" Url="/CS/home_cases.aspx" />
    <SubArea Id="nav_accts" Entity="account" DescriptionResourceId="Account_SubArea_Description" />
    <SubArea Id="nav_contacts" Entity="contact" DescriptionResourceId="Contact_SubArea_Description" />
    </Group>
    <Group Id="CS_New_Group">
    <Titles>
    <Title LCID="1033" Title="Group 2"/>
    </Titles>
    <SubArea Id="nav_managekb" ResourceId="Homepage_KBManager"
    DescriptionResourceId="KBManager_SubArea_Description" Icon="/_imgs/ico_18_126.gif"
    Url="/cs/home_managekb.aspx" AvailableOffline="false">
    <Privilege Entity="kbarticle" Privilege="Read,Write,Create" />
    </SubArea>
    <SubArea Id="nav_contracts" Entity="contract"
    DescriptionResourceId="Contract_SubArea_Description" />
    <SubArea Id="nav_products" Entity="product" DescriptionResourceId="Product_SubArea_Description" />
    <SubArea Id="nav_services" Entity="service" DescriptionResourceId="Service_SubArea_Description" />
    </Group>
    </Area>

    The changes are as follows:


    • The Area element includes the attribute ShowGroups="true"
    • Both Group elements now include a Title in a Titles element.
    • The new Group has a unique value for the Id attribute.
    • Some of the SubArea elements have been moved into the new Group.

Change the Workplace profile options that people can choose from


  • When you add groups to the Workplace area, you can set the IsProfile attribute to "true". This will allow users to choose whether they want this group to be displayed in their Workplace area, in their personal options.

Convert a Dynamic Entity to a System Entity

This sample code shows how to convert a dynamic entity instance into a strongly typed account entity instance. The code first creates a dynamic entity, populates its properties with account attributes and values, and then converts the dynamic entity to an account entity.


using System;
using System.Reflection;

using CrmSdk;
using Microsoft.Crm.Sdk.Utility;

namespace Microsoft.Crm.Sdk.HowTo
{
public class ConvertDynamicToCore
{
static void Main(string[] args)
{
// TODO: Change the server URL and organization to match your Microsoft
// Dynamics CRM Server and Microsoft Dynamics CRM organization.
ConvertDynamicToCore.Run("http://localhost:5555", "CRM_SDK");
}

public static bool Run(string crmServerUrl, string orgName)
{
// Create an account dynamic entity.
DynamicEntity accountDynamicEntity = new DynamicEntity();

//Set a few account properties.
StringProperty name = new StringProperty();
name.Name = "name";
name.Value = "Fabrikam Inc.";

StringProperty accountnumber = new StringProperty();
accountnumber.Name = "accountnumber";
accountnumber.Value = "AZ1200";

Picklist plist = new Picklist();
plist.name = "UPS";
plist.Value = 2;

PicklistProperty shippingmethodcode = new PicklistProperty();
shippingmethodcode.Name = "address1_shippingmethodcode";
shippingmethodcode.Value = plist;

accountDynamicEntity.Properties = new Property[] { name, accountnumber, shippingmethodcode };
accountDynamicEntity.Name = EntityName.account.ToString();

//Create a strongly typed account entity to copy the dynamic entity into.
account coreAccount = new account();

//Convert the dynamic entity to a strongly typed business entity.
coreAccount = (account)Convert(accountDynamicEntity);

Console.WriteLine("\n|Core Account Attributes\n|=======================");
Console.WriteLine("|name: {0}", coreAccount.name);
Console.WriteLine("|accountnumber: {0}", coreAccount.accountnumber);
Console.WriteLine("|address1_shipmethodcode: {0}", coreAccount.address1_shippingmethodcode.Value);

return true;
}

///
/// Convert a dynamic entity into a strongly typed business entity.
///

public static BusinessEntity Convert(DynamicEntity entity)
{
string coreEntityName = entity.Name;

Type entType = (new account()).GetType();
ConstructorInfo init = entType.GetConstructor(new Type[] { });
object ent = init.Invoke(new object[] { });

foreach (Property p in entity.Properties)
{
PropertyInfo entProp = entType.GetProperty(p.Name);
if (null == entProp)
{
Console.WriteLine("Could not find attribute {0} on entity {1}.", p.Name, coreEntityName);
}
else
{
entProp.SetValue(ent, GetAttribute(entity, p.Name), null);
}
}
return (BusinessEntity)ent;
}

///
/// This method returns the value of a dynamic entity attribute.
///

public static object GetAttribute(BusinessEntity entity, string attribute)
{
if (entity.GetType() == typeof(DynamicEntity))
{
DynamicEntity de = (DynamicEntity)entity;
foreach (Property prop in de.Properties)
{
if (prop.Name == attribute)
{
PropertyInfo propInfo = prop.GetType().GetProperty("Value");
return propInfo.GetValue(prop, null);
}
}
return null;
}
else
{
PropertyInfo propInfo = entity.GetType().GetProperty(attribute);
return propInfo.GetValue(entity, null);
}
}
}
}


Microsoft Dynamics CRM 4.0 Reports

What is Microsoft  Dynamics CRM Reports

It uses the term Report to refer to any type of data analysis file, regardless of its origin and type. Therefore, a report may be a Microsoft Office Excel file, a SQL Server Reporting Services report, a third-party reporting file, or a link to an external Web page report.

How to create Reports

Microsoft Dynamics CRM 4.0 includes approximately 24 Reporting Services reports in the default installation and those reports include an additional 28 Subreports. However we will definitely want to create new reports (or modify the default reports) as we customize our MS CRM database with new entity attributes and custom entities.
In Microsoft Dynamics CRM 4.0 we can create Reports in two methods:

Report Wizard

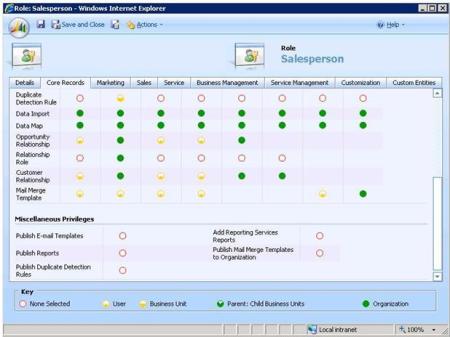
All users have access to the Report Wizard to create a report for their personal use, assuming they have any level of access to the Report Create Privilege. The Installation enables the Report Create Privilege on all security roles by default. By default, the Report Wizard creates the report as a personal (individual viewable) report.One can access the Report Wizard by creating a new report from the Reports grid. In addition to creating a report, one can use the Report Wizard to edit an existing Report Wizard report.

Report Definition Language with VS 2005
One can create their own Reporting Services report from scratch by using Visual Studio 2005. To develop reports in VS 2005, one should need Business Intelligence Development Studio add-in to be installed with VS 2005

Reporting Service Versions

Microsoft Dynamics CRM 4.0 Supports the following Reporting Services editions:
1. SQL Server 2005, Standard Edition with SP2
2. SQL Server 2005, Enterprise Edition with SP2
3. SQL Server 2005, Workgroup Edition with SP2
4. SQL Server 2005, Standard Edition, x64 SP2
5. SQL Server 2005, Enterprise Edition x64 SP2

Data Flow Diagram

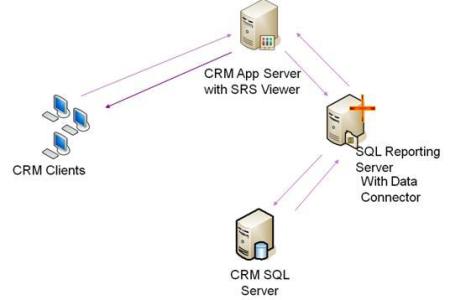
DFD

Microsoft Dynamics CRM 4.0 reports depend on the connector for Microsoft SQL server Reporting services. SSRS data connector used to proxy request between CRM 4.0, SSRS and SQL server thereby removing trust for delegation Requirement. The SRS connector runs as an SSRS Data Processing Extension and handles all of the delegation for you. The use of the data connector is recommended for Internet facing deployments and anywhere users are not using NT Auth to connect to CRM. Other way to do this in Microsoft CRM 4.0 is to use integrated authentication where trust for delegation is required between the CRM server, the SSRS server and the SQL server with the CRM DB.

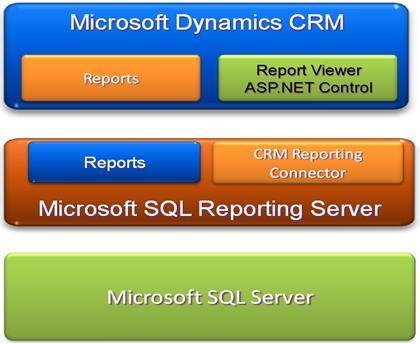
Reporting Services Architecture Diagram

Reporting Services Architecture Diagram

Microsoft Dynamics CRM 4.0 Architecture Consist of three layers. First level is MS Dynamics CRM which consist of Reports and Report Viewer ASP.Net Control, here Reports is nothing but an Entity which presented in MSCRM which is not there in MSCRM 3.0 Version. The SQL Reporting Services Report Viewer is an ASP.Net control which runs on the CRM 4.0 Web server. When you choose to run a report from Microsoft CRM 4.0, the ASP.Net control requests the report and data from the remote SSRS box. In practical terms, In Microsoft CRM 4.0 the URL for a report is the CRM Web server.

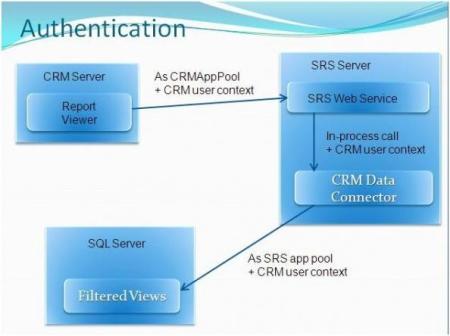
Authentication in MSCRM 4.0 Reports

Authentication in MSCRM 4.0 Reports

Microsoft Dynamics CRM 4.0 Server uses Report viewer to display data from SRS Server, the connection between Report Viewer and SRS Webservice uses CRM User Context for Authentication.SRS Webservice and CRM Data Connector uses SRS App pool and CRM User Context for establishing connection to MSCRM Filtered views in SQL Server. All data retrieved using CRM Data Connecter controlled by CRM Roles and Privileges Advantages of Data Connector are that it Removes trust for delegation (TFD) requirement. Enabling reports for external applications still is subject to TFD.Report entity is a full CRM entity and Sharing Report is also available. No longer need to make calls to SRS to display list of reports in CRM.RDLs are mastered in CRM.

Note:

  1. If a user does not have Privileges in CRM he or she will get a blank Report.
  2. Credentials supplied by the user running the report option which expects SystemUserId as the Login Name and OrganizationId as the Password.
  3. Sharing Reports – Users Can share their reports to a team or any specific user.

Prerequisites for Installation of SRS Data Connector:

  1. SQL Server Reporting Service 2005 or 2008
  2. MS CRM 4.0 needs to be installed (Connector requires MSCRM_CONFIG db)

Installation of SRS Data Connector:

  1. Run the Splash.exe file
  2. Select SRS Data Connector
  3. Select Update the Installation files(Recommended)
  4. Select the MSCRM db Server name in the picklist

Security Privileges

Security Privileges

In Microsoft Dynamics CRM 4.0 Reports are just like CRM system entity. As such, the report entity adheres to the standard security characteristic with that applies to all entities in MS CRM. Each report in MSCRM contains a viewable by attribute, with values of organization or individual. If the report viewable by value equals organization, all users will be able to run reports, provided they have read privileges. If the viewable by value equals individual, the report read privileges will determine each user’s access to the report.

Other Privileges:

  1. Publish Reports – allows users to make a report available to the Organization
  2. Add Reporting Services Reports – allows users to upload .rdl files
  3. Create : allows users to create reports using the Report Wizard

Existing roles will get access to reports as follows:

  1. Manage Reports privilege : full access
  2. Other : default privileges

Get the selected items in a CRM grid in CRM 4.0


//With this function you get only the GUIDs of the records selected.
function GetSelectedItemsInGrid()
{
return getSelected("crmGrid");
}

Use LINQ to Retrieve Data from Microsoft Dynamics CRM

The XrmDataContext class contains an underlying query provider to translate LINQ queries from C# syntax into the query API that the Microsoft Dynamics CRM can read natively. This query provider abstracts much of the Microsoft Dynamics CRM SDK query APIs under a more familiar C# syntax; however, the querying capability of the query provider is limited to the functionality provided by Microsoft Dynamics CRM. There are some areas indicated where you may have problems with the standard LINQ to Objects capabilities when applied to the Microsoft Dynamics CRM LINQ provider. For more information about the LINQ query language, see LINQ. For more information about query features in Microsoft Dynamics CRM, see Building Queries.

The Advanced Developer Extensions LINQ query provider offers the following capabilities:

  • Supports the Join, Where, OrderBy, and Select functions.
  • Supports the Skip, Take, Distinct, Single, and First functions.
  • Handles the other IEnumerable extensions.
  • Supports Select to anonymous types, constructors, and initializers.
  • Supports Where conditions with Contains, StartsWith, EndsWith, and Equals String functions.
  • Allows you to specify attributes statically or dynamically.

To get an idea of what the typical Microsoft Dynamics CRM LINQ queries look like, here are some samples of common data retrieval scenarios.

Examples

The following example shows how to retrieve all contact records.

// Loop through all Microsoft Dynamics CRM contacts using the IQueryable interfaces
// on the XrmDataContext object.
System.Console.WriteLine("List all contacts in CRM");
System.Console.WriteLine("========================");
foreach (var c in crm.contacts)
{
System.Console.WriteLine(c.fullname + " " + c.emailaddress1);
}

The next sample adds a "where" clause filter and returns a single result.

// Find a contact by user name.
var namedContact = (
from contact in crm.cContacts
where contact.Username emailaddress1 == " allison.brown@contoso.com someuser"
select contact).Single();

// Here is the equivalent query using an inline expression.
var namedContact2 = crm.Contacts.Where(c => c.Username == "someuser").Single();
Console.WriteLine(namedContact.Username);var allisonBrown =
crm.contacts.FirstOrDefault(c => c.emailaddress1 == "allison.brown@contoso.com");

if (allisonBrown != null)
{
System.Console.WriteLine(allisonBrown.fullname)
}


A basic join can be done between two entities with a where clause added against one or both entities.

System.Console.WriteLine("List all contacts where Parent Customer = 'Contoso':");
var contosoContacts = from c in crm.contacts
join parentCustomer in crm.accounts
on c.parentcustomerid.Value equals parentCustomer.accountid
where parentCustomer.name == "Contoso"
select c;

foreach (var c in contosoContacts)
{
System.Console.WriteLine(c.fullname + " " + c.emailaddress1);
}

A many-to-many relationship requires a more complex query that involves joining a relationship entity between the two entities.

// List the contacts in the Softball team marketing list.
System.Console.WriteLine("List all contacts in Softball Team:");

var members = from c in crm.contacts
join mlm in crm.listmembers on c.contactid equals mlm.entityid
join ml in crm.lists on mlm.listid equals ml.listid
where ml.listname == "Softball Team"
select c;

foreach (var c in members)
{
System.Console.WriteLine(c.fullname + " " + c.emailaddress1);
}

When you access a date/time attribute value, you can use the formatted values collection to retrieve the value in the user's converted time zone.

var query = from contact in crm.contacts
where contact.fullname.Contains("Ken")
select new { contact.fullname, contact.contactid, contact.createdon };
foreach (var c in query)
{
System.Console.WriteLine(c.fullname);
System.Console.WriteLine(c.contactid);
System.Console.WriteLine(c.FormattedValues["createdon"]);
}