Showing posts with label WebService. Show all posts

Web.Config Guide


In this article, will be explaining the common and mostly used web.config tags, their different sections and also discuss about securing the the config file.

Introduction

Here in this article, I will be exploring the configuration files of a website. ASP.NET website configuration is normally a combination of two files:

  • machine.config
  • web.config

Here, I'll concentrate on web.config and give an overview of machine.config.

Every time we install the .NET framework, there is a machine.config file that is created in "C:\WINDOWS\Microsoft.NET\Framework\[Version]\CONFIG", which mainly defines:

  • Supported configuration file sections,
  • the ASP.NET worker process configuration, and
  • registers different providers that are used for advanced features such as profiles, membership, and role based security.

To explore the web.config might take a book, but here, I'll try to explore all the important sections that play a pivotal role for an ASP.NET website and its deployment.

Every web application inherits settings from the machine.config file, and application level setting is done in the web.config file. We can also override configurations in the machine.config file in the web.config file. But, a few settings can not be overridden because certain settings are process model settings and can't be changed on a per application basis.

The entire contents of a configuration file, whether it is machine.config or web.config, is nested in a <configuration> element.

ASP.NET clip_image001

ASP.NET uses a multilayered configuration system that allows for using different settings for different parts of an application. For this, we must have an additional subdirectory inside the virtual directory, and these subdirectories will contain their own config files with additional settings. ASP.NET uses configuration inheritance so that each subdirectory acquires the settings from the parent directory.

Let's take an example. We have a web request http://localhost/X/Y/Z/page.aspx, where X is the root directory of the application. In this case, multiple levels of settings come into the picture.

  1. The default machine.config settings are applied first.
  2. Next, the web.config of the root level is applied. This web.config resides in the same config directory as the machine.config file.
  3. Now, if there is any config file in the application root X, these settings are applied.
  4. If there is any config file in the sub directory Y, these settings are now applied.
  5. If there is any config file in the application root Z, those settings are then applied.

But here, there is a limitation: we can have unlimited number of subdirectories having different settings, but the configuration at step 1 and 2 are more significant because some of the settings can not be overridden, like the Windows account that is to be used to execute the code, and other settings can be only overridden at the application root level, like the type of authentication to be used etc.

Different config files are useful when we apply different security settings to different folders. The files that need to be secured would then be placed in a separate folder with a separate web.config file that defines the more stringent security settings to these files and vice versa.

In the web.config, under the <configuration> element, there is another element <system.web>, which is used for ASP.NET settings and contains separate elements for each aspect of the configuration.

Important Configuration Tags

There are a lot of configuration tags that are provided by the web.config file, like authentication, authorization, browserCaps, clientTarget etc., but all of these don't have that much importance (and also can't be covered in a single article ), so here, I have only concentrated on the main tags of the config file.

<authentication>

This element is used to verify the client's identity when the client requests a page from the server. This is set at the application level. We have four types of authentication modes: “None”, “Windows”, “Forms”, and “Passport”.

If we don't need any authentication, this is the setting we use:

<authentication mode="None"/>

Normally, Windows authentication is used, for which, we need to check the checkbox: Integrated Windows Authentication.

<authentication mode="Windows"/>

This authentication is handled by IIS. When the user sends a request to the server, IIS authenticates it and sends the authentication identity to the code.

clip_image002

IIS gives us four choices for the authentication modes: Anonymous, Basic, Digest, and Windows Integrated. If the user selects Anonymous, then IIS doesn't perform any authentication. For Basic authentication, the user has to provide a username and password. This authentication is very unsecure, because the user credentials are sent in clear text format over the network. Digest authentication is same as Basic, except it hashes the user's password and transmits the hashed version over the wire. So, it is more secure than Basic. For Windows Integrated authentication, passwords never cross the network. The user must still have a username and password, but the application uses either the Kerberos or a challenge/response protocol to authenticate the user.

Forms authentication uses web application forms to collect user credentials, and on the basis of the credential, it takes action on a web application.

<authentication mode="Forms">
<forms name="Form" loginUrl="index.asp" />
</authentication>

Passport authentication is provided by Microsoft. A redirect URL should be specified, and is used when the requested page is not authenticated, and then it redirects to this URL.

<authentication mode="Passport">
<passport redirectUrl="internal" />
</authentication>

Here, users are authenticated using the information in Microsoft's Passport database. The advantage is, we can use existing user credentials (such as an email address and password) without forcing users to go through a separate registration process. The disadvantage is we need to go through the licensing agreement with Microsoft and pay a yearly fee based on the use.

For using Passport authentication, you first install the Passport Software Development Kit (SDK) on your server. The SDK can be downloaded from here. It includes full details of implementing passport authentication in your own applications.

<authorization>

The <authorization> tag controls client access to web page resources. This element can be declared at any level (machine, site, application, subdirectory, or page).

<authorization>
<allow users="comma-separated list of users"
roles="comma-separated list of roles"
verbs="comma-separated list of verbs"/>
<deny users="comma-separated list of users"
roles="comma-separated list of roles"
verbs="comma-separated list of verbs"/>
</authorization>

<allow> : Using this tag, we can control access to resources on the basis of the following verbs. In these attributes, we use symbols: ? and *.? means for anonymous users/resources, and * means for all users.

  • users: This contains the list of user names (comma separated) that are allowed to access the resources.
  • roles: This contains the list of roles (comma separated) that are allowed to access the resources.
  • verbs: This contains the list of HTTP verbs to which the action applies (comma separated). It is used to create a rule that applies to a specific type of HTTP request (GET, POST, HEAD, OR DEBUG).

<deny> : Using this tag, we can control access to resources on the basis of the following verbs:

  • users: This contains the list of users names (comma separated) that are denied access to the resources.
  • roles: This contains the list of roles (comma separated) that are denied access to the resources.
  • verbs: This contains the list of HTTP verbs to which the action applies (comma separated). It is used to create a rule that applies to a specific type of HTTP request (GET, POST, HEAD, OR DEBUG).

<compilation>

In this section, we can configure the settings of the compiler. Here, we can have lots of attributes, but the most common ones are debug and defaultLanguage. Setting debug to true means we want the debugging information in the browser, but it has a performance tradeoff, so normally, it is set as false. And, defaultLanguage tells ASP.NET which language compiler to use: VB or C#.

<customErrors>

This tags includes the error settings for the application, and is used to give custom error pages (user-friendly error pages) to end users. In the case that an error occurs, the website is redirected to the default URL. For enabling and disabling custom errors, we need to specify the mode attribute.

<customErrors defaultRedirect="url" mode="Off">
<error statusCode="403" redirect="/accesdenied.html" />
<error statusCode="404" redirect="/pagenotfound.html" />
</customErrors>

  • "On" means this settings is on, and if there is any error, the website is redirected to the default URL.
  • "Off" means the custom errors are disabled.
  • "RemoteOnly" shows that custom errors will be shown to remote clients only.

<error statusCode="403" redirect="/accesdenied.html" />
<error statusCode="404" redirect="/pagenotfound.html" />

This means if there is an error of 403, then the website will redirected to the custom page accessdenied.html. Similarly for 404 as defined above.

Note: If an error occurs in the custom error page itself, ASP.NET won't able to handle it. It won't try to reforward the user to the same page. Instead, it'll show the normal default client error page with a generic message.

<globalization>

This section is used when we want to use encoding or specify a culture for the application. This is a very vast topic, and can take an article itself for explaining it. Here, we define the character set for the server to send the response to the client, which is by default is UTF-8, and the settings of which the server should use to interpret and display culturally specific strings, such as numbers and dates.

<globalization requestEncoding="utf-8" responseEncoding="utf-8" />

<httpRuntime>

This section can be used to configure the general runtime settings of the application. The main two are:

<httpRuntime appRequestQueueLimit="50" executionTimeout="300" />

As the name suggests, the attribute appRequestQueueLimit defines the number of requests that can be queued up on the server for processing. If there are 51 or more requests, then server would return the 503 error ("Server too busy").

The attribute executionTimeout defines the number of minutes ASP.NET will process a request before it gets timeout.

<trace>

As the name suggestz, it is used for tracing the execution of an application. We have here two levels of tracing: page level and application level. Application level enables the trace log of the execution of every page available in the application. IfpageOutput="true", trace information will be displayed at the bottom of each page. Else, we can view the trace log in the application root folder, under the name trace.axd.

<trace enabled="false" requestLimit="10" pageOutput="false"
traceMode="SortByTime" locaOnly="true" />

Set the attribute localOnly to false for not viewing the trace information from the client.

For enabling trace at page level, set Trace="True" in the Page tag (on the top of the page).

<identity>

Using this tag, we can control the identity of the application. By default, Impersonation is disabled. Using Impersonation, an ASP.NET application can execute optionally with the identity of a client on whose behalf they are operating.

<identity impersonate="false" userName="domain\username" password="password" />

<sessionState>

In this section, we tell ASP.NET where to store the session. By default, it's inproc which means storing the session values on the server. But we have four options:

  • "Off" means session is not enabled for the application.
  • "inproc" means storing the session values on the server.
  • "StateServer" means session states are stored in a remote server.
  • "SQLServer" means session states are stored in a SQL Server database. For this, we need to install the InstallSQLState.sql script in the SQL Server database. It is mainly used when the we use web farms (an application deployed on multiple servers), but it makes the performance slow as compared to "inproc".

Here are the other settings:

  • "cookieless": when it is true, it means the session used is without cookies.
  • “timeout” specifies after how much time the session would expire if the application is not accessed during that period.
  • "stateConnectionString" needs to be specified when the session mode is StateServer.
  • "sqlConnectionString" is the connection string of the SQL Server database if the session mode is sqlserver.
  • "stateNetworkTimeout" attribute, when using the StateServer mode to store session state, specifies the number of seconds the TCP/IP network connection between the web server and the state server can be idle before the session is abandoned. The default is 10.

<sessionState mode="Off"
cookieless="true"
timeout="100"
stateConnectionString="tcpip=server:port"
sqlConnectionString="sql connection string"
stateNetworkTimeout="number of seconds"/>

<appSettings>

This section is used to store custom application configuration like database connection strings, file paths etc. This also can be used for custom application-wide constants to store information over multiple pages. It is based on the requirements of the application.

<appSettings>
<add key="Emailto" value="me@microsoft.com" />
<add key="cssFile" value="CSS/text.css" />
</appSettings>

It can be accessed from code like:

ConfigurationSettings.AppSettings("Emailto");

All the values returned from it are strings.

Custom Configuration Sections

We might need some custom configuration sections based on the requirements. One of the simplest ways we can do this is to create our own named sections, and we can use existing NameValueSectionHandler components to parse them, and they can be used as key/value pairs to be accessed at run-time.

clip_image003

This can be read very easily accessed from the code-behind as:

private string ReadCustomSection()
{
string strKey = "mySectionKey1";
NameValueCollection nvcmySection = (NameValueCollection)
ConfigurationSettings.GetConfig("mySection");
string strValueofKey = nvcmySection[strKey];
return strValueofKey;
}

There are more ways for using custom configuration sections. Check this article: CustomConfigurationSection.

Encrypting Configuration Sections

Some times, we put some sensitive data in the web.config file like connection strings, user specific details etc. It is recommended to encrypt these sections. ASP.NET supports two encryption techniques.

  • RSA
  • DPAPI

The way the operations perform is very simple. When retrieving information from a config file, ASP.NET automatically decrypts it and gives the plain text to the code. Similarly, if we do any updates on the config file from code, it is done the same way. We cannot update a config file directly. But, we can use WAT for updating it.

Programmatic encryption techniques: If we want to do encryption programmatically, then we need to retrieve the corresponding ConfigurationSection.SectionInformation object and call the ProtectSection() method. If we want to decrypt a section, then we can call the method UnprotectSetion(). Sample code is shown here:

Configuration myConfig =
WebConfigurationManager.OpenWebConfiguration(Request.ApplicationPath);
ConfigurationSection mySettings = myConfig.GetSection("mySection");
if (mySettings.SectionInformation.IsProtected)
{
mySettings.SectionInformation.UnprotectSection();
}
else
{
mySettings.SectionInformation.ProtectSection("DataProtectionConfigurationProvider"); ;
}
myConfig.Save();

Command line utilities: We can also use a command line utility like aspnet_regiis.exe for encryption of a config file, which is a CAB file found in C:\[WinDir]\Microsoft.NET\Framework\[Version]. For using this tool, we must create a virtual directory for the application. You can refer my article, Deploying Website at IIS, for more information.

When using aspnet_regiis to protect some sections of a config file, we need to specify some command line arguments such as:

  • The -pe switch specifies the configuration section to encrypt.
  • The -app switch specifies our web application virtual path.
  • The -prov switch specifies the provider name.

Here is the command line for an application located at http://localhost/MyApp:

clip_image004

A Few Important Points

  • Some settings can not be encrypted because they are used outside ASP.NET (mainly by the IIS web server), like <httpruntime>.
  • Config files are case sensitive.
  • The web.config file is protected by IIS, so it won't be accessible by a client system. So, if a user tries to access it, anaccess denied message will be shown.
  • If we change the config file at the server, we don't need to restart the web server because IIS monitors the changes in the web.config, and for performance measures, it cache it.
  • Microsoft also provides a tool known as Website Administration Tool (WAT) that lets us configure various part of the web.config using a web interface. To run it, select Website

What is WCF RIA service?

WCF RIA service is a framework to develop n-tier application for Rich Internet Application (RIA). It is mainly used in RIA applications like Silverlight, AJAX client, etc. It solves the major problem while developing business application like decoupling the resource access, application logic and presentation layer. WCF RIA service was introduced in Silverlight 4 with .net framework 4, and it can be developed using visual studio2010.

Main problem developer are facing while developing the n-tier RIA application will be coordinating the application logic between middle tier and presentation tier. This problem will be solved by using WCF RIA service, it will synchronize the code between middle and presentation tier.

WCF RIA service will allow developer to write the set of service code and this server code will be available to the client side without manually duplicate that programming logic. RIA service client will be updated with business rule and entity present at the server side, when your recompile your project solution.

WCF RIA service will generate the code at the client side related to the service and domain entities declared at the server side.

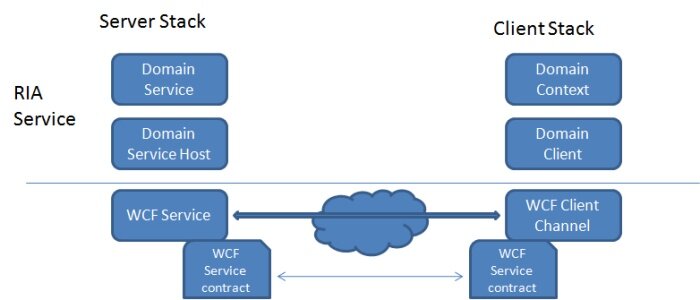
RIA service exposes the data from server side to client side using Domain service, RIA service framework implements the each domain service as WCF service to access the data as business entity.

  1. WCF RIA Domain Service

  2. Problems solved in RIA Service

  3. Query/Update process in RIA

  4. How to create Silverlight-WCF RIA service

fig: WCF RIA Serive architecture
WCF RIA Serive architecture


Domain Service

Domain services are WCF services that expose the business logic of a WCF RIA Services application. Domain service contains set of business related data operation and it is exposed as WCF service.

Below diagram explains integration of the RIA service with WCF

The DomainService class is the base class for all classes that serve as domain services.

  • DomainServiceHost is the hosting class for domain service; internally
  • DomainServiceHost uses the WCF ServiceHost class to host the application.

A domain service class must be marked with the EnableClientAccessAttribute attribute to make the service available to the client project. The EnableClientAccessAttributeattribute is automatically applied to a domain service when you select the Enable client access check box in the Add New Domain Service Class dialog box. When the EnableClientAccessAttribute attribute is applied to a domain service, RIA Services generates the corresponding classes for the client project.

   1:  //Example:
   2:   [EnableClientAccess()]
   3:      public class EmployeeDomainService : DomainService
   4:      {
   5:          private EmployeeData data = EmployeeData.Instance;
   6:   
   7:          public IEnumerable < Employee> GetEmployees()
   8:          {
   9:              return data.EmployeeList;
  10:          }
  11:      }
  12:   


DomainContext class at the client side is used to consume the Domain service by using DomainClient object. DomainContext class available inside the name space "System.ServiceModel.DomainServices.Client"

fig: WCF RIA Domain Serive architecture
WCF RIA Domain Serive


Problem solved in RIA


  1. To have best performance of the RIA application, app logic need to be available in client and server side. This problem is solved by auto generating the code at the client side while recompiling the project.
  2. Asynchronous call – Asynch service call are supported in Domain service by using WCF infrastructure
  3. Handling large data and data across different tier – Large amount of data can be access and filter using IQueryable object. Since entity objects used in domain service are serializable and so it can be access across different layer
  4. Security/Access control – ASP.Net membership frameworks are integrated with RIA service to provide security systems to RIA service
  5. Validation – Entity can be validated based using adding attribute to the class members

   1:  //Example:
   2:    public class Member
   3:      {
   4:          [Key]
   5:          public int MemberId { get; set; }
   6:   
   7:   
   8:          public string Fname { get; set; }
   9:   
  10:          [Required]
  11:          public string Lname { get; set; }
  12:   
  13:          public DateTime JoinDate { get; set; }
  14:   
  15:          [Range(30,90, ErrorMessage="sorry, you are either too young or too old for our club!")]
  16:          public int Age { get; set; }
  17:      }


Querying/Updating data in RIA Service


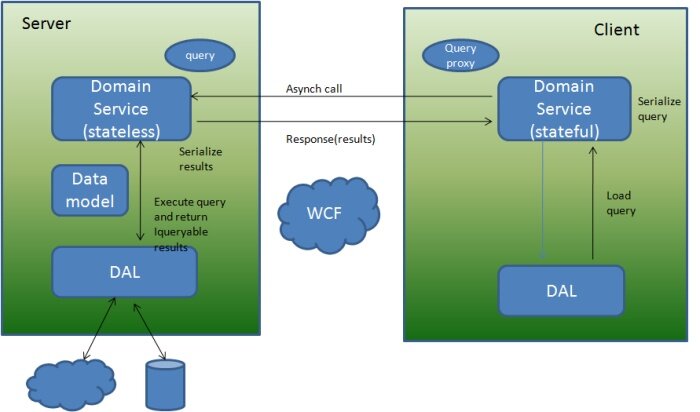
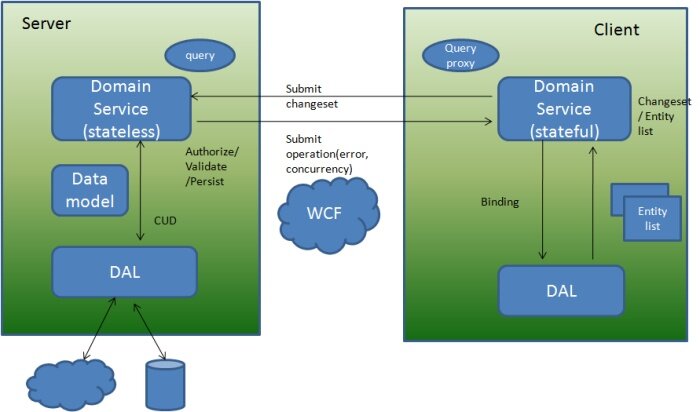
The below diagram are self explanatory to discuss about the querying or updating the data using RIA service

fig: WCF RIA to Query data


fig: WCF RIA to update data


How to Create WCF RIA Service


Download:
Silverlight_WCF_RIA_Service.zip

Let us understand more about the WCF RIA service by creating Silverlight client application which read and updated the Employee details from WCF RIA Service.

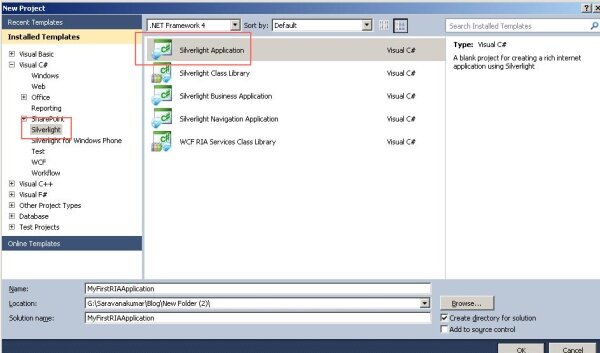
Step 1:Start the Visual Studio 2010 and click File -> New-> Project. Enter the project name and click “Create”

Project creation

Step 2:Select “Enable WCF RIA Services”. This will make your Silverlight application to user WCF RIA service

Select RIA service

Step 3:Create “Data” folder and add DataModel” class as shown below. This is the data class which will return list of Employee and update the employee list

Data Model class:


   1:  public class Employee
   2:      {
   3:          [Key]
   4:          public int EmpId { get; set; }
   5:          public string Fname { get; set; }
   6:          public string Lname { get; set; }
   7:          public DateTime JoinDate { get; set; }
   8:          public int Age { get; set; }
   9:      }
  10:   
  11:   
  12:      public partial class EmployeeData
  13:      {
  14:          private static readonly EmployeeData _instance = new EmployeeData();
  15:          private EmployeeData() { }
  16:          public static EmployeeData Instance
  17:          {
  18:              get
  19:              {
  20:                  return _instance;
  21:              }
  22:          }
  23:   
  24:   
  25:          private List < Employee > empList = new List < Employee>()
  26:          {
  27:              new Employee() { EmpId  = 1, Fname = "Sam", Lname = "kumar", 
  28:                              JoinDate=new DateTime(2010,7, 21), Age=30},
  29:              new Employee() { EmpId = 2, Fname = "Ram", Lname = "kumar", 
  30:                              JoinDate=new DateTime(2009,6,8), Age=35},    
  31:              new Employee() { EmpId = 3, Fname = "Sasi", Lname = "M", 
  32:                              JoinDate=new DateTime(2008,3,5), Age=39},  
  33:              new Employee() { EmpId = 4, Fname = "Praveen", Lname = "KR", 
  34:                              JoinDate=new DateTime(2010, 5,1), Age=56},
  35:              new Employee() { EmpId = 5, Fname = "Sathish", Lname = "V", 
  36:                              JoinDate = new DateTime(2006,12,15), Age=72},  
  37:              new Employee() { EmpId = 6, Fname = "Rosh", Lname = "A", 
  38:                              JoinDate=new DateTime(2009,2,2), Age=25}
  39:          };
  40:   
  41:          public IEnumerable< Employee > EmployeeList
  42:          {
  43:              get
  44:              {
  45:                  return empList;
  46:              }
  47:          }
  48:   
  49:   
  50:          public void Update(Employee updEmployee)
  51:          {
  52:              Employee existing = empList.Find(p => p.EmpId == updEmployee.EmpId);
  53:              if (existing == null)
  54:                  throw new KeyNotFoundException("Specified Employee cannot be found");
  55:   
  56:              existing.Fname = updEmployee.Fname;
  57:              existing.Lname = updEmployee.Lname;
  58:              existing.JoinDate = updEmployee.JoinDate;
  59:              existing.Age = updEmployee.Age;
  60:          }
  61:      }


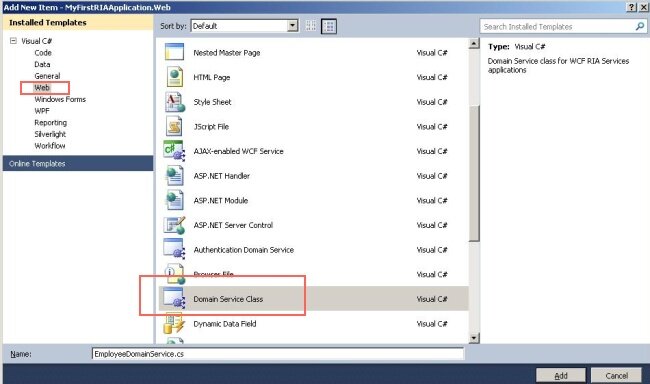
Step 4:To expose the Employee related operation to the client side, Create domain service class. By right click project file and select Add new item.

Create Domain Service

Step 5:Add code to return the Employee list

Domain Service class:


   1:  // TODO: Create methods containing your application logic.
   2:      [EnableClientAccess()]
   3:      public class EmployeeDomainService : DomainService
   4:      {
   5:          //Create instance of the Data access layer
   6:          private EmployeeData data = EmployeeData.Instance;
   7:   
   8:          public IEnumerable< Employee> GetEmployee()
   9:          {
  10:              return data.EmployeeList ;
  11:          }
  12:   
  13:          public void UpdateEmployee(Employee emp)
  14:          {
  15:              data.Update(emp);
  16:          }
  17:      }


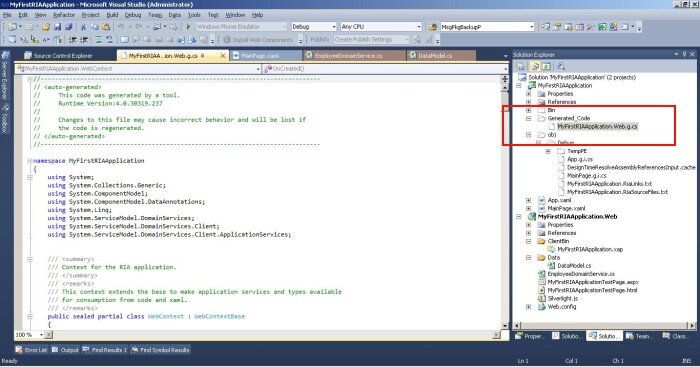
Step 6:Compile the solution – After compilation RIA service will generate the application logic at the client side using DomainContext object. Enable show all files option for the solution and view the auto generated code.

Auto generated code

Step 7:View the DomainContext class are created at the client side.

Domain Context class at client:


   1:   /// 
   2:      /// The DomainContext corresponding to the 'EmployeeDomainService' DomainService.
   3:      /// 
   4:      public sealed partial class EmployeeDomainContext : DomainContext
   5:      {
   6:          
   7:          #region Extensibility Method Definitions
   8:   
   9:          /// 
  10:          /// This method is invoked from the constructor once initialization is complete and
  11:          /// can be used for further object setup.
  12:          /// 
  13:          partial void OnCreated();
  14:   
  15:          #endregion
  16:          
  17:          
  18:          /// 
  19:          /// Initializes a new instance of the < see cref="EmployeeDomainContext"/> class.
  20:          /// 
  21:          public EmployeeDomainContext() : 
  22:                  this(new WebDomainClient< IEmployeeDomainServiceContract>(new 
  23:                                Uri("MyFirstRIAApplication-Web-EmployeeDomainService.svc", 
  24:                                                          UriKind.Relative)))
  25:          {
  26:          }
  27:   
  28:          ........
  29:          ........


Step 8:Add DataGrid to Main.xaml file to display the employee details query from DataModel and add two buttons to update and reject the data changed from client side.


Main.xaml

 < Grid x:Name="LayoutRoot" Background="White">
        < StackPanel Orientation="Vertical" HorizontalAlignment="Left"  >
        < sdk:DataGrid x:Name="EmployeeGrid" AutoGenerateColumns="True"  
                        RowEditEnded="EmployeeGrid_RowEditEnded" />
            < Button Content="Accept" Height="23" Name="btnAccept" 
                        Width="75" Margin="5" Click="btnAccept_Click"  />
            < Button Content="Reject" Height="23" Name="btnReject" 
                        Width="75" Margin="5" Click="btnReject_Click"/>
        </StackPanel>
    </Grid>


Main.xaml.vb

   1:  public partial class MainPage : UserControl
   2:      {
   3:          //create instance of Doman context class
   4:          EmployeeDomainContext ctx = new EmployeeDomainContext();
   5:   
   6:          public MainPage()
   7:          {
   8:              InitializeComponent();
   9:              //Load query data , Read data from DAL layer to UI
  10:              EntityQuery< Employee> query = ctx.GetEmployeeQuery();
  11:              LoadOperation< Employee> lo = ctx.Load< Employee>(query);
  12:              EmployeeGrid.ItemsSource = lo.Entities;
  13:          }
  14:   
  15:          private void EmployeeGrid_RowEditEnded(object sender, 
  16:                                  DataGridRowEditEndedEventArgs e)
  17:          {
  18:   
  19:          }
  20:   
  21:          private void btnAccept_Click(object sender, RoutedEventArgs e)
  22:          {
  23:              //Update the DAL with user changes
  24:              ctx.SubmitChanges();
  25:          }
  26:   
  27:          private void btnReject_Click(object sender, RoutedEventArgs e)
  28:          {
  29:              //Roll back the user changes
  30:              ctx.RejectChanges();
  31:          }
  32:      }


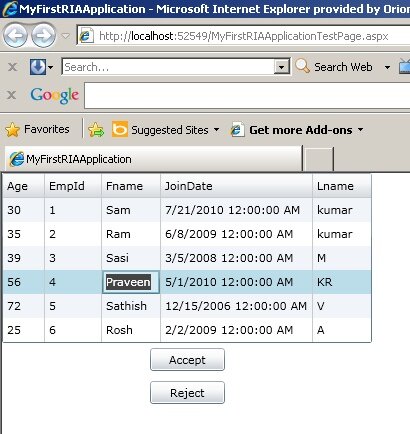
Step 9:Run the application and see the output as shown below

RIA service output

WCF Architecture

The following figure illustrates the major components of WCF.

 050000_WCF-Architecture

Figure 1: WCF Architecture

Contracts

Contracts layer are next to that of Application layer. Developer will directly use this contract to develop the service. We are also going to do the same now. Let us see briefly what these contracts will do for us and we will also know that WCF is working on message system.

Service contracts

- Describe about the operation that service can provide. Example, Service provided to know the temperature of the city based on the zip code, this service we call as Service contract. It will be created using Service and Operational Contract attribute.

Data contract

- It describes the custom data type which is exposed to the client. This defines the data types, are passed to and from service. Data types like int, string are identified by the client because it is already mention in XML schema definition language document, but custom created class or datatype cannot be identified by the client e.g. Employee data type. By using DataContract we can make client aware that we are using Employee data type for returning or passing parameter to the method.

Message Contract

- Default SOAP message format is provided by the WCF runtime for communication between Client and service. If it is not meeting your requirements then we can create our own message format. This can be achieved by using Message Contract attribute.

Policies and Binding

- Specify conditions required to communicate with a service e.g security requirement to communicate with service, protocol and encoding used for binding.

Service Runtime

- It contains the behaviors that occur during runtime of service.

  • Throttling Behavior- Controls how many messages are processed.
  • Error Behavior - Specifies what occurs, when internal error occurs on the service.
  • Metadata Behavior - Tells how and whether metadata is available to outside world.
  • Instance Behavior - Specifies how many instance of the service has to be created while running.
  • Transaction Behavior - Enables the rollback of transacted operations if a failure occurs.
  • Dispatch Behavior - Controls how a message is processed by the WCF Infrastructure.
Messaging

- Messaging layer is composed of channels. A channel is a component that processes a message in some way, for example, by authenticating a message. A set of channels is also known as a channel stack. Channels are the core abstraction for sending message to and receiving message from an Endpoint. Broadly we can categories channels as

  • Transport Channels

    Handles sending and receiving message from network. Protocols like HTTP, TCP, name pipes and MSMQ.

  • Protocol Channels

    Implements SOAP based protocol by processing and possibly modifying message. E.g. WS-Security and WS-Reliability.

Activation and Hosting

- Services can be hosted or executed, so that it will be available to everyone accessing from the client. WCF service can be hosted by following mechanism

  • IIS

    Internet information Service provides number of advantages if a Service uses Http as protocol. It does not require Host code to activate the service, it automatically activates service code.

  • Windows Activation Service

    (WAS) is the new process activation mechanism that ships with IIS 7.0. In addition to HTTP based communication, WCF can also use WAS to provide message-based activation over other protocols, such as TCP and named pipes.

  • Self-Hosting

    WCF service can be self hosted as console application, Win Forms or WPF application with graphical UI.

  • Windows Service

    WCF can also be hosted as a Windows Service, so that it is under control of the Service Control Manager (SCM).

Consuming a WCF service


Adding references to WCF services is trivially easy with Visual Studio 2008, but if you're still working with 2005 there are a few things that need to be considered when referencing WCF services instead of using Add Web Reference

The following step-by-step is meant to help particularly those who have not developed WCF services but just need to consume them.  It applies to both, VS 2005 and VS 2008.

Prerequisite installs for Visual Studio 2005

If you are in a library, console, or Windows forms project, you should be seeing an Add Service Reference item in your project's context menu. If you don't see this, you are missing some prerequisites. Download and install the following packages:

  1. .NET Framework 3.0 Redistributable
    These are the libraries that contain the WCF namespaces, such as System.ServiceModel and System.Runtime.Serialization. This package also contains WF and WPF runtime libraries.
  2. Visual Studio 2005 "Orcas" Extensions
    The WCF and WPF (Windows Presentation Foundation) extensions that enable IDE integration into Visual Studio 2005.
  3. .NET Framework 3.0 SP1

You should not have to install the Windows SDK (it's a huge download) to enable IDE integration, even if the Extensions install complains that it's not present. Ignore this message if you are only interested in consuming WCF services.

VS 2005 web site projects

In Visual Studio 2005, you will not see an Add Service Reference command in web site projects, even after installing above prerequisites.  Apparently this was an oversight and didn't quite make it into the Extensions CTP release, because VS 2008 has this option.  To work around this you have two options:

  • Create a class library project, add it to your solution, and create your service references there. You will need to transfer generated app.config sections to your web.config (see below). 
  • Generate your proxy classes and configurations using svcutil.exe utility, and include the generated files in the web site project.
Adding the Service Reference
  1. Test the service from your web browser. Navigate to the .svc file. If everything checks out, copy the URL from the Address bar.
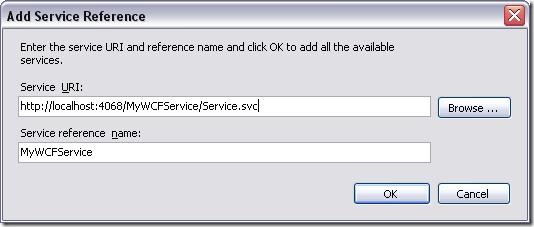
  2. Right-click on the project in the Solution Explorer window and choose Add Service Reference. In VS 2005, you'll see the following dialog.
    Add Service Reference Dialog
  3. Enter (paste) the URL to your service's .svc file. (.svc?wsdl works as well)
  4. Give the service a short but descriptive name. This will become a part of your proxy class' namespace (more about that later).

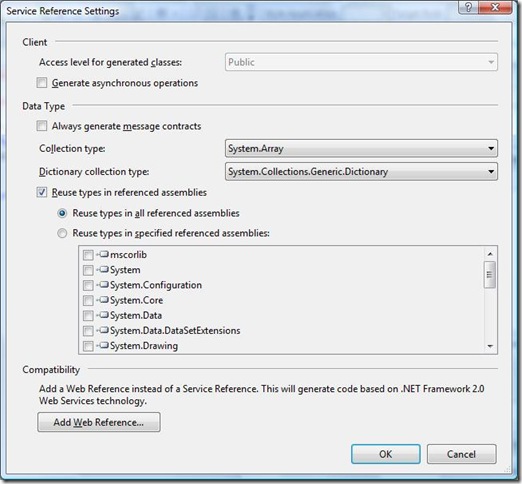
In VS 2008, you see more a bit more information about the service, plus you get a lot more control over generated data types through the Advanced options dialog:
Ref2008_Advanced

This will generate several files. What files are generated differs between VS 2005 and VS 2008, and between non-web and web projects in VS 2008. Essentially you will come out of this operation with a proxy class and some configuration values.

The client proxy class

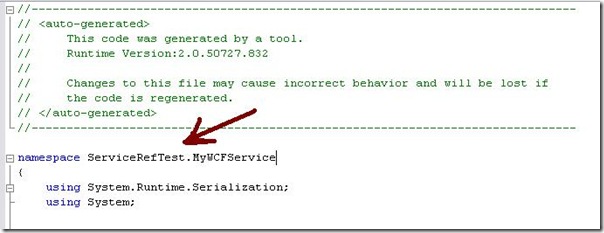
When you expand the tree under the service reference, you'll find a .cs file (VS 2005) that contains your proxy class. Note that it adopted the root namespace of the project it was generated in. I mention this because this is an important difference from how .asmx references were created, and also from how svcutil.exe creates your proxy.

proxy namespace

To instantiate the proxy class, use the following naming pattern:


ProjectRootNamespace.ServiceReferenceName.ServiceNameClient myServiceClient =
               new ProjectRootNamespace.ServiceReferenceName.ServiceNameClient("EndpointConfigurationName");


Notice the class name ends in Client.  Where do you get the EndpointConfigurationName from?  Glad you asked. Read on...

Configuration considerations

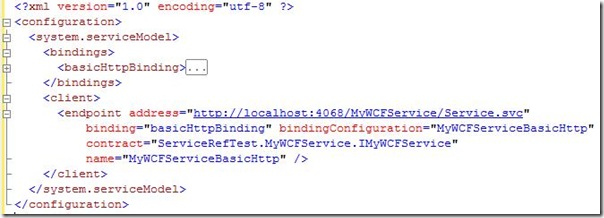
Besides generating a proxy class, Visual Studio's also writes a section into your .config file when you Add a Service Reference. This section is bounded by


<system.serviceModel>  </system.serviceModel>


tags. If you generated the proxy in a class library project, you will have to copy this section to the executing assembly project's .config file. 

appconfig

One of the nice advantages of using a service reference over a web reference is that you have complete control over the channel stack, security, protocols, etc. through configuration. The generated configuration mimics the service's configuration on the server. The things to understand are:


  • Endpoints, in the <client> node, consist of an Address, a Binding and a Contract.  A service can expose multiple endpoints, but since you are pointing your reference tool at a specific endpoint, and not the service directly, you will only ever get one from the tool. The endpoint has a name, which you need when instantiating a the client proxy (so EndpointConfigurationName above would be replaced with MyWCFServiceBasicHttp in this example).
  • The Binding defined in the <bindings> node defines the communication patterns. It is referenced by the endpoint with the bindingConfiguration attribute.
  • The Contract defined by a fully qualified interface name. Notice that the namespace is NOT the namespace defined in the service, but the one your proxy class resides in. This may be confusing especially if you also developed the service.  If you instantiate your proxy class with above example, you don't need to care about the interface .

Again, remember to copy these sections into the executing assembly's .config file!

Updating a service reference

If the service implementation changes without data- or service contract (method signature) changes, you don't need to do anything at the client. If the contract or address has changed, however, you need to re-generate your proxy and may need to update your configuration. This can also be done through the IDE. 


  • Right-click on the reference in Solution Explorer and choose Update Service Reference.
    This will also replace the .config section, regardless of server config changes or not. If you made config changes in your client config, be aware that you may end up with double entries with names such as MyWCFServiceBasicHttp1 (to use the example above). You should clean those up, or you will end up with a holy mess after a while.

If your service moved, or you want to test, say, the staging or production service, the procedure differs between VS2005 and 2008:


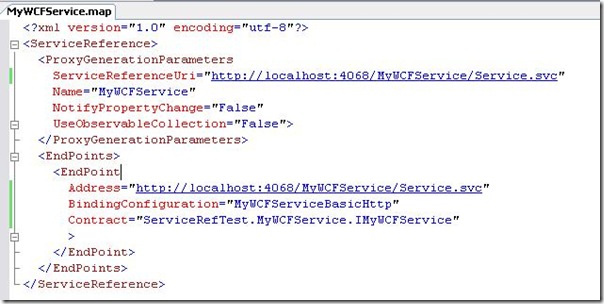
  • VS2005:  Open the  .map file under the service reference. It looks something like this:
    map file
    Edit the ServiceReferenceUri only, and save the .map file, and Update Service Reference as before.  You will see the EndPoint Address change automatically as the service is contacted, a new proxy is generated and the .config file is updated.
  • VS2008:  Right-click the reference in Solution Explorer and choose Configure Service Reference.  You will see the Service Reference Settings dialog (see above). Change the Address value, click OK, and everything that needs to happen happens.

Remember again, to copy the config section into your executing assembly if you are operating in a class library.

Using svcutil.exe

You can do all the above and more using the command line tool, svcutil.exe.  In VS2005, this may be your best option if you want to establish service references in a web site project.

Note that the tool resides in different locations for the different VS versions:


  • VS2005: C:\Program Files\Microsoft Visual Studio 8\Common7\IDE\
  • VS2008: C:\Program Files\Microsoft SDKs\Windows\v6.0A\Bin\

Open a command prompt, navigate to your project directory, and use this simple command line to generate a proxy and config:


"C:\Program Files\Microsoft Visual Studio 8\Common7\IDE\svcutil.exe" http://localhost:4068/MyWCFService/Service.svc /out:MyWCFService.cs


This is the basic command line, you may want to investigate into other options for lots more control. For more information see http://msdn2.microsoft.com/en-us/library/aa347733.aspx.

Configurations will be written into an output.config file. CAUTION: If you use the /config switch, do not directly reference your application configuration file, as it will be overwritten. If you had other config sections, you have just lost them. The VS IDE is much smarter about diffing the .config files first.

Notice that the namespace of the generated proxy class is based on the service's namespace if you don't specify it explicitly through the commandline.

svcutil_namespace

Include the proxy class in your project (in a web project, in your app_code folder), and copy the config sections into the executing assembly config ... done!

WCF: Introduction to WCF


Introduction to WCF
Windows Communication Foundation (Code named Indigo) is a programming platform and runtime system for building, configuring and deploying network-distributed services. It is the latest service oriented technology; Interoperability is the fundamental characteristics of WCF. It is unified programming model provided in .Net Framework 3.0. WCF is a combined features of Web Service, Remoting, MSMQ and COM+. WCF provides a common platform for all .NET communication.
Below figures shows the different technology combined to form WCF.
Advantage
  1. WCF is interoperable with other services when compared to .Net Remoting,where the client and service have to be .Net.
  2. WCF services provide better reliability and security in compared to ASMX web services.
  3. In WCF, there is no need to make much change in code for implementing the security model and changing the binding. Small changes in the configuration will make your requirements.
  4. WCF has integrated logging mechanism, changing the configuration file settings will provide this functionality. In other technology developer has to write the code.

Development Tools

WCF application can be developed by the Microsoft Visual Studio. Visual studio is available at different edition. You can use Visual Studio 2008 Expression edition for the development.
Visual Studio 2008 SDK 1.1

Microsoft Visual Studio 2008

Microsoft Visual studio 2008 provides new features for WCF compared to Visual Studio 2005. These are the new features added to VS 2008.

1.     Multi-targeting

You can create application in different framework like Framework 2.0, 3.0 and 3.5

2.     Default template is available for WCF

3.     WCF - Test Client tools for testing the WCF service.

Microsoft provides inbuilt application to test the WCF application. This can be done by opening the Visual Studio command prompt and type the wcfClient Serviceurl shows below. This will help the developer to test the service before creating the client application.
4.      WCF services can be debugged now in Visual Studio 2008. Wcfsvchost.exe will do it for you because service will be self hosted when you start debugging.

Difference between WCF and Web service

Web service is a part of WCF. WCF offers much more flexibility and portability to develop a service when comparing to web service. Still we are having more advantages over Web service, following table provides detailed difference between them.
Features
Web Service
WCF
Hosting
It can be hosted in IIS
It can be hosted in IIS, windows activation service, Self-hosting, Windows service
Programming
[WebService] attribute has to be added to the class
[ServiceContraact] attribute has to be added to the class
Model
[WebMethod] attribute represents the method exposed to client
[OperationContract] attribute represents the method exposed to client
Operation
One-way, Request- Response are the different operations supported in web service
One-Way, Request-Response, Duplex are different type of operations supported in WCF
XML
System.Xml.serialization name space is used for serialization
System.Runtime.Serialization namespace is used for serialization
Encoding
XML 1.0, MTOM(Message Transmission Optimization Mechanism), DIME, Custom
XML 1.0, MTOM, Binary, Custom
Transports
Can be accessed through HTTP, TCP, Custom
Can be accessed through HTTP, TCP, Named pipes, MSMQ,P2P, Custom
Protocols
Security
Security, Reliable messaging, Transactions