RevokeAccess Message

Revokes access rights to the entity instance for the specified security principal (user or team).

Remarks

To use this message, pass an instance of the RevokeccessRequest class as the request parameter in the Execute method.

This method also applies to all child instances of the target instance. For all child instances, if the caller does not have share privileges for those entity types or share rights to the instances, access to the child instances is not revoked. As a result, the owner of the instance or a user who shares the instance with share rights automatically has share rights to all child instances of the target instance. In this case, only the lack of privileges to a particular entity type prevents access to the child instances from being revoked.

For a description of how actions on a parent instance affect child instances, see Cascading Rules.

To perform this action, the caller must have access rights on the entity instance specified in the request class. For a list of required privileges, see RevokeAccess Privileges.

 
//#The following code example shows how to use the RevokeAccess message.

// Set up the CRM service.
CrmAuthenticationToken token = new CrmAuthenticationToken();
// You can use enums.cs from the SDK\Helpers folder to get the enumeration for Active Directory authentication.
token.AuthenticationType = 0;
token.OrganizationName = "AdventureWorksCycle";

CrmService service = new CrmService();
service.Url = "http://:/mscrmservices/2007/crmservice.asmx";
service.CrmAuthenticationTokenValue = token;
service.Credentials = System.Net.CredentialCache.DefaultCredentials;

// Create the SecurityPrincipal.
SecurityPrincipal principal = new SecurityPrincipal();
principal.Type = SecurityPrincipalType.User;

// PrincipalId is the GUID of the user whose access is being revoked.
principal.PrincipalId = new Guid("7B222F98-F48A-4AED-9D09-77A19CB6EE82");

// Create the target for the request.
TargetOwnedAccount target = new TargetOwnedAccount();

// EntityId is the GUID of the account to which access is being revoked.
target.EntityId = new Guid("2B951FBC-1C56-4430-B23B-20A1349068F3");

// Create the request object.
RevokeAccessRequest revoke = new RevokeAccessRequest();

// Set the properties of the request object.
revoke.Revokee = principal;
revoke.Target = target;

// Execute the request.
RevokeAccessResponse revoked = (RevokeAccessResponse)service.Execute(revoke);


Send a Custom E-mail for a Campaign Activity

The following sample shows how to send an e-mail for a campaign activity.


[C#]
public void SendEmail(Guid campaignActivityID)
{
CrmService service = new CrmService();
service.Credentials =
System.Net.CredentialCache.DefaultCredentials;

service.CallerIdValue = new CallerId();
// Replace the GUID with the GUID of your Microsoft Dynamics CRM
// Administrator.
service.CallerIdValue.CallerGuid =
new Guid("FD80F8E8-C852-DA11-B1FB-0007E94D105B");

SendEmailRequest req = new SendEmailRequest();
req.EmailId = campaignActivityID;
req.TrackingToken = "";
req.IssueSend = true;

try
{
SendEmailResponse res =
(SendEmailResponse)service.Execute(req);
}
catch (System.Web.Services.Protocols.SoapException er)
{
//Process any error messages here.
}
}


Cancel Message

Cancels a contract or salesorder

    //#Cancels a Contract
// Set up the CRM Service.
CrmAuthenticationToken token = new CrmAuthenticationToken();
// You can use enums.cs from the SDK\Helpers folder to get the enumeration for Active Directory authentication.
token.AuthenticationType = 0;
token.OrganizationName = "AdventureWorksCycle";

CrmService service = new CrmService();
service.Url = "http://:/mscrmservices/2007/crmservice.asmx";
service.CrmAuthenticationTokenValue = token;
service.Credentials = System.Net.CredentialCache.DefaultCredentials;

// Create the cancel request for a previously created contract
CancelContractRequest contactCancelationRequest = new CancelContractRequest();

// Set the properties for the request
contactCancelationRequest.ContractId = new Guid("C15AF217-C17E-DA11-B90F-000874DE7397");
contactCancelationRequest.CancelDate = new CrmDateTime();
contactCancelationRequest.CancelDate.Value = DateTime.Now.ToString();
contactCancelationRequest.Status = 5;

// Execute the request
service.Execute(contactCancelationRequest);


The following code example demonstrates how to cancel a sales order.

 
//# cancel a sales order.
// Set up the CRM Service.
CrmAuthenticationToken token = new CrmAuthenticationToken();
// You can use enums.cs from the SDK\Helpers folder to get the enumeration for Active Directory authentication.
token.AuthenticationType = 0;
token.OrganizationName = "AdventureWorksCycle";

CrmService service = new CrmService();
service.Url = "http://:/mscrmservices/2007/crmservice.asmx";
service.CrmAuthenticationTokenValue = token;
service.Credentials = System.Net.CredentialCache.DefaultCredentials;

// Create the order close activity object.
orderclose close = new orderclose();

// Set the properties of the order close object.
close.subject = "orderclose";

// Create a Lookup for the sales order being canceled.
close.salesorderid = new Lookup();
close.salesorderid.type = EntityName.salesorder.ToString();
close.salesorderid.Value = created.id;

// Create the request object.
CancelSalesOrderRequest cancel = new CancelSalesOrderRequest();

// Set the properties of the request object.
cancel.OrderClose = close;
cancel.Status = -1;

// Execute the request.
CancelSalesOrderResponse canceled = (CancelSalesOrderResponse) service.Execute(cancel);


Book Message

Schedules or "books" an appointment.


//# The following example shows how to use the Book message to schedule an appointment.
// Set up the CRM Service.
CrmAuthenticationToken token = new CrmAuthenticationToken();
// You can use enums.cs from the SDK\Helpers folder to get the enumeration for Active Directory authentication.
token.AuthenticationType = 0;
token.OrganizationName = "AdventureWorksCycle";

CrmService service = new CrmService();
service.Url = "http://:/mscrmservices/2007/crmservice.asmx";
service.CrmAuthenticationTokenValue = token;
service.Credentials = System.Net.CredentialCache.DefaultCredentials;

// Create the activityparty entity instance.
activityparty party = new activityparty();
party.scheduledstart = new CrmDateTime();
party.scheduledstart.Value = DateTime.Now.AddHours(1).ToString();
party.scheduledend = new CrmDateTime();
party.scheduledend.Value = DateTime.Now.AddHours(2).ToString();
party.partyid = new Lookup();
party.partyid.type = EntityName.systemuser.ToString();
party.partyid.Value = user.UserId;

// Create the appointment entity instance.
appointment appointment = new appointment();

// Set the appointment's properties.
appointment.description = "This is a test of the book message.";
appointment.scheduledstart = new CrmDateTime();
appointment.scheduledstart.Value = DateTime.Now.AddHours(1).ToString();
appointment.scheduledend = new CrmDateTime();
appointment.scheduledend.Value = DateTime.Now.AddHours(2).ToString();
appointment.location = "Office";
appointment.subject = "Testing book appointment";
appointment.requiredattendees = new activityparty[] {party};
appointment.statecode = new AppointmentStateInfo();
appointment.statecode.Value = AppointmentState.Open;
appointment.statuscode = new Status();
// This is the default value.
appointment.statuscode.Value = -1;

// Create the target.
TargetScheduleAppointment target = new TargetScheduleAppointment();

// Set the target properties.
target.Appointment = appointment;

// Create the request.
BookRequest book = new BookRequest();

// Set the request properties.
book.Target = target;

// Execute the request.
BookResponse booked = (BookResponse)service.Execute(book);


BackgroundSendEmail Message


//# Sends an e-mail asynchronously.
// Set up the CRM Service.
CrmAuthenticationToken token = new CrmAuthenticationToken();
// You can use enums.cs from the SDK\Helpers folder to get the enumeration for Active Directory authentication.
token.AuthenticationType = 0;
token.OrganizationName = "AdventureWorksCycle";

CrmService service = new CrmService();
service.Url = "http://:/mscrmservices/2007/crmservice.asmx";
service.CrmAuthenticationTokenValue = token;
service.Credentials = System.Net.CredentialCache.DefaultCredentials;

// Create a query for the BackgroundSendEmailRequest object that will find all
// e-mails with the text "SDK Sample E-mail" in the subject and a status code of
// "Pending Send".

// NOTE: A more robust query would include e-mails that have been downloaded
// previously but not sent for some reason and exclude emails that have failed
// delivery too many times.

// Create the condition for e-mail subject text.
ConditionExpression subjectCondition = new ConditionExpression();
subjectCondition.AttributeName = "subject";
subjectCondition.Operator = ConditionOperator.Like;
subjectCondition.Values = new string[] { "SDK Sample Email%" };

// Create the condition for e-mail status. Only draft e-mails will be sent.
ConditionExpression statusCondition = new ConditionExpression();
statusCondition.AttributeName = "statuscode";
statusCondition.Operator = ConditionOperator.Equal;
statusCondition.Values = new object[] { EmailStatus.PendingSend };

// Create the query filter.
FilterExpression emailFilter = new FilterExpression();
emailFilter.Conditions = new ConditionExpression[] { statusCondition };
emailFilter.FilterOperator = LogicalOperator.And;

// Query for e-mail activity to send.
QueryExpression emailsQuery = new QueryExpression();
// Be aware that using AllColumns may adversely affect
// performance and cause unwanted cascading in subsequent
// updates. A best practice is to retrieve the least amount of
// data required.
emailsQuery.ColumnSet = new AllColumns();
emailsQuery.EntityName = EntityName.email.ToString();
emailsQuery.Criteria = emailFilter;

// Create the request.
BackgroundSendEmailRequest bkgrndSendEmailRequest = new BackgroundSendEmailRequest();

// Set the query.
bkgrndSendEmailRequest.Query = emailsQuery;

// Execute the request. This will change the status from "Pending Send" to "Sending".
BackgroundSendEmailResponse bkgrndSendEmailResponse = (BackgroundSendEmailResponse)service.Execute(bkgrndSendEmailRequest);

foreach (email emailRecordToProcess in bkgrndSendEmailResponse.BusinessEntityCollection.BusinessEntities)
{
// Use SMTP or MAPI to compose actual emails and submit them for delivery.
}


Assign Message

Assigns the specified entity instance to a new security principal (user). This changes the ownerid attribute of the instance.


//# The following code example demonstrates how to assign the specified entity instance to a new security principal (user).

// Set up the CRM Service.
CrmAuthenticationToken token = new CrmAuthenticationToken();
// You can use enums.cs from the SDK\Helpers folder to get the enumeration for Active Directory authentication.
token.AuthenticationType = 0;
token.OrganizationName = "AdventureWorksCycle";

CrmService service = new CrmService();
service.Url = "http://:/mscrmservices/2007/crmservice.asmx";
service.CrmAuthenticationTokenValue = token;
service.Credentials = System.Net.CredentialCache.DefaultCredentials;

// Create the SecurityPrincipal object.
SecurityPrincipal assignee = new SecurityPrincipal();
assignee.Type = SecurityPrincipalType.User;

// PrincipalId is some known Guid belonging to the user or team that will own this record.
assignee.PrincipalId = new Guid("326A0053-71CB-465E-9BEB-633E2E0851A9");

// Create the target object for the request.
TargetOwnedAccount target = new TargetOwnedAccount();

// Set the properties of the target object.
// EntityId is some known Guid belonging to the account that is being assigned to the user.
target.EntityId = new Guid("2B951FBC-1C56-4430-B23B-20A1349068F3");

// Create the request object.
AssignRequest assign = new AssignRequest();

// Set the properties of the request object.
assign.Assignee = assignee;
assign.Target = target;

// Execute the request.
AssignResponse assignResponse = (AssignResponse)service.Execute(assign);


SetStateAccount Message

Sets the state of an account.


//# The following code example shows how to use the SetStateAccount message.

// Set up the CRM Service.
CrmAuthenticationToken token = new CrmAuthenticationToken();
// You can use enums.cs from the SDK\Helpers folder to get the enumeration for Active Directory authentication.
token.AuthenticationType = 0;
token.OrganizationName = "AdventureWorksCycle";

CrmService service = new CrmService();
service.Url = "http://:/mscrmservices/2007/crmservice.asmx";
service.CrmAuthenticationTokenValue = token;
service.Credentials = System.Net.CredentialCache.DefaultCredentials;

// Create the request object.
SetStateAccountRequest state = new SetStateAccountRequest();

// Set the properties of the request object.
state.AccountState = AccountState.Inactive;
state.AccountStatus = 2;

// EntityId is the GUID of the account whose state is being changed.
state.EntityId = new Guid("AD618DB2-F0DB-4A6A-8C4B-2F2213EAA38E");;

// Execute the request.
SetStateAccountResponse stateSet = (SetStateAccountResponse)service.Execute(state);


AddMembers


//The following code example demonstrates how to add a set of users to a team.
// Set up the CRM Service.
CrmAuthenticationToken token = new CrmAuthenticationToken();
// You can use enums.cs from the SDK\Helpers folder to get the enumeration for Active Directory authentication.
token.AuthenticationType = 0;
token.OrganizationName = "AdventureWorksCycle";

CrmService service = new CrmService();
service.Url = "http://:/mscrmservices/2007/crmservice.asmx";
service.CrmAuthenticationTokenValue = token;
service.Credentials = System.Net.CredentialCache.DefaultCredentials;

// Create the AddMembersTeamRequest object.
AddMembersTeamRequest addRequest = new AddMembersTeamRequest();

// Set the AddMembersTeamRequest TeamID property to the object ID of
// an existing team.
addRequest.TeamId = new Guid("9AF74EF9-A04C-DA11-A0C5-000D9DD8CDAC");

// Set the AddMembersTeamRequest MemberIds property to an
// array of GUIDs that contains the object IDs of one or more system users.
addRequest.MemberIds = new Guid[] {new Guid("A0F2D8FE-6468-DA11-B748-000D9DD8CDAC")};

// Execute the request.
AddMembersTeamResponse addResponse = (AddMembersTeamResponse)service.Execute(addRequest);


AddMember

Adds a member to a list. The member added must be one of the following entity types: account, contact, or lead.
To use this message, pass an instance of the AddMemberListRequest class as the request parameter in the Execute method.
To perform this action, the caller must have access rights on the list (marketing list) entity instance. For a list of required privileges, seeAddMemberList Privileges.
      
//# The following code example demonstrates how to add a member to a list.
// Set up the CRM Service.
CrmAuthenticationToken token = new CrmAuthenticationToken();
// You can use enums.cs from the SDK\Helpers folder to get the enumeration for Active Directory authentication.
token.AuthenticationType = 0; 
token.OrganizationName = "AdventureWorksCycle";
 
CrmService service = new CrmService();
service.Url = "http://<servername7gt;:<port>/mscrmservices/2007/crmservice.asmx";
service.CrmAuthenticationTokenValue = token;
service.Credentials = System.Net.CredentialCache.DefaultCredentials;

// Create the request object.
AddMemberListRequest add = new AddMemberListRequest();

// Set the properties of the request object.
add.EntityId = new Guid("b050f053-yur3-dc31-bb3a-0003ffbad37a");
add.ListId = new Guid("C15AF217-C17E-DA11-B90F-000874DE7397");

// Execute the request.
AddMemberListResponse added = (AddMemberListResponse) service.Execute(add);


Web.Config Guide


In this article, will be explaining the common and mostly used web.config tags, their different sections and also discuss about securing the the config file.

Introduction

Here in this article, I will be exploring the configuration files of a website. ASP.NET website configuration is normally a combination of two files:

  • machine.config
  • web.config

Here, I'll concentrate on web.config and give an overview of machine.config.

Every time we install the .NET framework, there is a machine.config file that is created in "C:\WINDOWS\Microsoft.NET\Framework\[Version]\CONFIG", which mainly defines:

  • Supported configuration file sections,
  • the ASP.NET worker process configuration, and
  • registers different providers that are used for advanced features such as profiles, membership, and role based security.

To explore the web.config might take a book, but here, I'll try to explore all the important sections that play a pivotal role for an ASP.NET website and its deployment.

Every web application inherits settings from the machine.config file, and application level setting is done in the web.config file. We can also override configurations in the machine.config file in the web.config file. But, a few settings can not be overridden because certain settings are process model settings and can't be changed on a per application basis.

The entire contents of a configuration file, whether it is machine.config or web.config, is nested in a <configuration> element.

ASP.NET clip_image001

ASP.NET uses a multilayered configuration system that allows for using different settings for different parts of an application. For this, we must have an additional subdirectory inside the virtual directory, and these subdirectories will contain their own config files with additional settings. ASP.NET uses configuration inheritance so that each subdirectory acquires the settings from the parent directory.

Let's take an example. We have a web request http://localhost/X/Y/Z/page.aspx, where X is the root directory of the application. In this case, multiple levels of settings come into the picture.

  1. The default machine.config settings are applied first.
  2. Next, the web.config of the root level is applied. This web.config resides in the same config directory as the machine.config file.
  3. Now, if there is any config file in the application root X, these settings are applied.
  4. If there is any config file in the sub directory Y, these settings are now applied.
  5. If there is any config file in the application root Z, those settings are then applied.

But here, there is a limitation: we can have unlimited number of subdirectories having different settings, but the configuration at step 1 and 2 are more significant because some of the settings can not be overridden, like the Windows account that is to be used to execute the code, and other settings can be only overridden at the application root level, like the type of authentication to be used etc.

Different config files are useful when we apply different security settings to different folders. The files that need to be secured would then be placed in a separate folder with a separate web.config file that defines the more stringent security settings to these files and vice versa.

In the web.config, under the <configuration> element, there is another element <system.web>, which is used for ASP.NET settings and contains separate elements for each aspect of the configuration.

Important Configuration Tags

There are a lot of configuration tags that are provided by the web.config file, like authentication, authorization, browserCaps, clientTarget etc., but all of these don't have that much importance (and also can't be covered in a single article ), so here, I have only concentrated on the main tags of the config file.

<authentication>

This element is used to verify the client's identity when the client requests a page from the server. This is set at the application level. We have four types of authentication modes: “None”, “Windows”, “Forms”, and “Passport”.

If we don't need any authentication, this is the setting we use:

<authentication mode="None"/>

Normally, Windows authentication is used, for which, we need to check the checkbox: Integrated Windows Authentication.

<authentication mode="Windows"/>

This authentication is handled by IIS. When the user sends a request to the server, IIS authenticates it and sends the authentication identity to the code.

clip_image002

IIS gives us four choices for the authentication modes: Anonymous, Basic, Digest, and Windows Integrated. If the user selects Anonymous, then IIS doesn't perform any authentication. For Basic authentication, the user has to provide a username and password. This authentication is very unsecure, because the user credentials are sent in clear text format over the network. Digest authentication is same as Basic, except it hashes the user's password and transmits the hashed version over the wire. So, it is more secure than Basic. For Windows Integrated authentication, passwords never cross the network. The user must still have a username and password, but the application uses either the Kerberos or a challenge/response protocol to authenticate the user.

Forms authentication uses web application forms to collect user credentials, and on the basis of the credential, it takes action on a web application.

<authentication mode="Forms">
<forms name="Form" loginUrl="index.asp" />
</authentication>

Passport authentication is provided by Microsoft. A redirect URL should be specified, and is used when the requested page is not authenticated, and then it redirects to this URL.

<authentication mode="Passport">
<passport redirectUrl="internal" />
</authentication>

Here, users are authenticated using the information in Microsoft's Passport database. The advantage is, we can use existing user credentials (such as an email address and password) without forcing users to go through a separate registration process. The disadvantage is we need to go through the licensing agreement with Microsoft and pay a yearly fee based on the use.

For using Passport authentication, you first install the Passport Software Development Kit (SDK) on your server. The SDK can be downloaded from here. It includes full details of implementing passport authentication in your own applications.

<authorization>

The <authorization> tag controls client access to web page resources. This element can be declared at any level (machine, site, application, subdirectory, or page).

<authorization>
<allow users="comma-separated list of users"
roles="comma-separated list of roles"
verbs="comma-separated list of verbs"/>
<deny users="comma-separated list of users"
roles="comma-separated list of roles"
verbs="comma-separated list of verbs"/>
</authorization>

<allow> : Using this tag, we can control access to resources on the basis of the following verbs. In these attributes, we use symbols: ? and *.? means for anonymous users/resources, and * means for all users.

  • users: This contains the list of user names (comma separated) that are allowed to access the resources.
  • roles: This contains the list of roles (comma separated) that are allowed to access the resources.
  • verbs: This contains the list of HTTP verbs to which the action applies (comma separated). It is used to create a rule that applies to a specific type of HTTP request (GET, POST, HEAD, OR DEBUG).

<deny> : Using this tag, we can control access to resources on the basis of the following verbs:

  • users: This contains the list of users names (comma separated) that are denied access to the resources.
  • roles: This contains the list of roles (comma separated) that are denied access to the resources.
  • verbs: This contains the list of HTTP verbs to which the action applies (comma separated). It is used to create a rule that applies to a specific type of HTTP request (GET, POST, HEAD, OR DEBUG).

<compilation>

In this section, we can configure the settings of the compiler. Here, we can have lots of attributes, but the most common ones are debug and defaultLanguage. Setting debug to true means we want the debugging information in the browser, but it has a performance tradeoff, so normally, it is set as false. And, defaultLanguage tells ASP.NET which language compiler to use: VB or C#.

<customErrors>

This tags includes the error settings for the application, and is used to give custom error pages (user-friendly error pages) to end users. In the case that an error occurs, the website is redirected to the default URL. For enabling and disabling custom errors, we need to specify the mode attribute.

<customErrors defaultRedirect="url" mode="Off">
<error statusCode="403" redirect="/accesdenied.html" />
<error statusCode="404" redirect="/pagenotfound.html" />
</customErrors>

  • "On" means this settings is on, and if there is any error, the website is redirected to the default URL.
  • "Off" means the custom errors are disabled.
  • "RemoteOnly" shows that custom errors will be shown to remote clients only.

<error statusCode="403" redirect="/accesdenied.html" />
<error statusCode="404" redirect="/pagenotfound.html" />

This means if there is an error of 403, then the website will redirected to the custom page accessdenied.html. Similarly for 404 as defined above.

Note: If an error occurs in the custom error page itself, ASP.NET won't able to handle it. It won't try to reforward the user to the same page. Instead, it'll show the normal default client error page with a generic message.

<globalization>

This section is used when we want to use encoding or specify a culture for the application. This is a very vast topic, and can take an article itself for explaining it. Here, we define the character set for the server to send the response to the client, which is by default is UTF-8, and the settings of which the server should use to interpret and display culturally specific strings, such as numbers and dates.

<globalization requestEncoding="utf-8" responseEncoding="utf-8" />

<httpRuntime>

This section can be used to configure the general runtime settings of the application. The main two are:

<httpRuntime appRequestQueueLimit="50" executionTimeout="300" />

As the name suggests, the attribute appRequestQueueLimit defines the number of requests that can be queued up on the server for processing. If there are 51 or more requests, then server would return the 503 error ("Server too busy").

The attribute executionTimeout defines the number of minutes ASP.NET will process a request before it gets timeout.

<trace>

As the name suggestz, it is used for tracing the execution of an application. We have here two levels of tracing: page level and application level. Application level enables the trace log of the execution of every page available in the application. IfpageOutput="true", trace information will be displayed at the bottom of each page. Else, we can view the trace log in the application root folder, under the name trace.axd.

<trace enabled="false" requestLimit="10" pageOutput="false"
traceMode="SortByTime" locaOnly="true" />

Set the attribute localOnly to false for not viewing the trace information from the client.

For enabling trace at page level, set Trace="True" in the Page tag (on the top of the page).

<identity>

Using this tag, we can control the identity of the application. By default, Impersonation is disabled. Using Impersonation, an ASP.NET application can execute optionally with the identity of a client on whose behalf they are operating.

<identity impersonate="false" userName="domain\username" password="password" />

<sessionState>

In this section, we tell ASP.NET where to store the session. By default, it's inproc which means storing the session values on the server. But we have four options:

  • "Off" means session is not enabled for the application.
  • "inproc" means storing the session values on the server.
  • "StateServer" means session states are stored in a remote server.
  • "SQLServer" means session states are stored in a SQL Server database. For this, we need to install the InstallSQLState.sql script in the SQL Server database. It is mainly used when the we use web farms (an application deployed on multiple servers), but it makes the performance slow as compared to "inproc".

Here are the other settings:

  • "cookieless": when it is true, it means the session used is without cookies.
  • “timeout” specifies after how much time the session would expire if the application is not accessed during that period.
  • "stateConnectionString" needs to be specified when the session mode is StateServer.
  • "sqlConnectionString" is the connection string of the SQL Server database if the session mode is sqlserver.
  • "stateNetworkTimeout" attribute, when using the StateServer mode to store session state, specifies the number of seconds the TCP/IP network connection between the web server and the state server can be idle before the session is abandoned. The default is 10.

<sessionState mode="Off"
cookieless="true"
timeout="100"
stateConnectionString="tcpip=server:port"
sqlConnectionString="sql connection string"
stateNetworkTimeout="number of seconds"/>

<appSettings>

This section is used to store custom application configuration like database connection strings, file paths etc. This also can be used for custom application-wide constants to store information over multiple pages. It is based on the requirements of the application.

<appSettings>
<add key="Emailto" value="me@microsoft.com" />
<add key="cssFile" value="CSS/text.css" />
</appSettings>

It can be accessed from code like:

ConfigurationSettings.AppSettings("Emailto");

All the values returned from it are strings.

Custom Configuration Sections

We might need some custom configuration sections based on the requirements. One of the simplest ways we can do this is to create our own named sections, and we can use existing NameValueSectionHandler components to parse them, and they can be used as key/value pairs to be accessed at run-time.

clip_image003

This can be read very easily accessed from the code-behind as:

private string ReadCustomSection()
{
string strKey = "mySectionKey1";
NameValueCollection nvcmySection = (NameValueCollection)
ConfigurationSettings.GetConfig("mySection");
string strValueofKey = nvcmySection[strKey];
return strValueofKey;
}

There are more ways for using custom configuration sections. Check this article: CustomConfigurationSection.

Encrypting Configuration Sections

Some times, we put some sensitive data in the web.config file like connection strings, user specific details etc. It is recommended to encrypt these sections. ASP.NET supports two encryption techniques.

  • RSA
  • DPAPI

The way the operations perform is very simple. When retrieving information from a config file, ASP.NET automatically decrypts it and gives the plain text to the code. Similarly, if we do any updates on the config file from code, it is done the same way. We cannot update a config file directly. But, we can use WAT for updating it.

Programmatic encryption techniques: If we want to do encryption programmatically, then we need to retrieve the corresponding ConfigurationSection.SectionInformation object and call the ProtectSection() method. If we want to decrypt a section, then we can call the method UnprotectSetion(). Sample code is shown here:

Configuration myConfig =
WebConfigurationManager.OpenWebConfiguration(Request.ApplicationPath);
ConfigurationSection mySettings = myConfig.GetSection("mySection");
if (mySettings.SectionInformation.IsProtected)
{
mySettings.SectionInformation.UnprotectSection();
}
else
{
mySettings.SectionInformation.ProtectSection("DataProtectionConfigurationProvider"); ;
}
myConfig.Save();

Command line utilities: We can also use a command line utility like aspnet_regiis.exe for encryption of a config file, which is a CAB file found in C:\[WinDir]\Microsoft.NET\Framework\[Version]. For using this tool, we must create a virtual directory for the application. You can refer my article, Deploying Website at IIS, for more information.

When using aspnet_regiis to protect some sections of a config file, we need to specify some command line arguments such as:

  • The -pe switch specifies the configuration section to encrypt.
  • The -app switch specifies our web application virtual path.
  • The -prov switch specifies the provider name.

Here is the command line for an application located at http://localhost/MyApp:

clip_image004

A Few Important Points

  • Some settings can not be encrypted because they are used outside ASP.NET (mainly by the IIS web server), like <httpruntime>.
  • Config files are case sensitive.
  • The web.config file is protected by IIS, so it won't be accessible by a client system. So, if a user tries to access it, anaccess denied message will be shown.
  • If we change the config file at the server, we don't need to restart the web server because IIS monitors the changes in the web.config, and for performance measures, it cache it.
  • Microsoft also provides a tool known as Website Administration Tool (WAT) that lets us configure various part of the web.config using a web interface. To run it, select Website

Retrieve Message

Retrieves a business entity instance with the specified ID.

Remarks

To use this message, pass an instance of the RetrieveRequest class as the request parameter in the Execute method. If the columnset includes attributes that are not valid for retrieve, they will be ignored. To perform this action, the caller must have access rights on the entity instance specified in the request class. For a list of required privileges, see Retrieve Privileges.

For better performance, use the Retrieve method instead of using this message.


//# The following code example shows how to use the Retrieve message.

// Set up the CRM service.
CrmAuthenticationToken token = new CrmAuthenticationToken();
// You can use enums.cs from the SDK\Helpers folder to get the enumeration for Active Directory authentication.
token.AuthenticationType = 0;
token.OrganizationName = "AdventureWorksCycle";

CrmService service = new CrmService();
service.Url = "http://:/mscrmservices/2007/crmservice.asmx";
service.CrmAuthenticationTokenValue = token;
service.Credentials = System.Net.CredentialCache.DefaultCredentials;

// Create the column set object that indicates the fields to be retrieved.
ColumnSet cols = new ColumnSet();

// Set the properties of the column set.
cols.Attributes = new string [] {"name"};

// Create the target object for the request.
TargetRetrieveAccount target = new TargetRetrieveAccount();

// Set the properties of the target object.
// EntityId is the GUID of the record being retrieved.
target.EntityId = new Guid("2B951FBC-1C56-4430-B23B-20A1349068F3");

// Create the request object.
RetrieveRequest retrieve = new RetrieveRequest();

// Set the properties of the request object.
retrieve.Target = target;
retrieve.ColumnSet = cols;

// Execute the request.
RetrieveResponse retrieved = (RetrieveResponse)service.Execute(retrieve);


AddItem Plugin Message (Campaign)

Adds an item to a campaign. The item added must be one of the following entity types: campaign, list, product, or salesliterature.

The relevant classes are specified in the following table.

Type                         Class

Request                     AddItemCampaignRequest

Response                  AddItemCampaignResponse

Entity                          campaign

Optional Parameters   RequestIdOptionalParameter

Remarks

To use this message, pass an instance of the AddItemCampaignRequest class as the request parameter in the Execute method.

To perform this action, the caller must have access rights on the campaign entity instance. For a list of required privileges, seeAddItemCampaign Privileges.


//The following code example demonstrates how to add an item to a campaign.
// Set up the CRM Service.
CrmAuthenticationToken token = new CrmAuthenticationToken();
// You can use enums.cs from the SDK\Helpers folder to get the enumeration.
token.AuthenticationType = 0;
token.OrganizationName = "AdventureWorksCycle";

CrmService service = new CrmService();
service.Url = "http://:/mscrmservices/2007/crmservice.asmx";
service.CrmAuthenticationTokenValue = token;
service.Credentials = System.Net.CredentialCache.DefaultCredentials;

// Create the request object.
AddItemCampaignRequest add = new AddItemCampaignRequest();

// Set the properties of the request object.
add.CampaignId = new Guid("b4502053-6968-dc11-bb3a-0003ffbad8542");
add.EntityId = new Guid("b050f053-yur3-dc31-bb3a-0003ffbad37a");
add.EntityName = EntityName.product;
// Execute the request.
AddItemCampaignResponse added = (AddItemCampaignResponse)service.Execute(add);


Common Context

This section describes the information that is available in the InputParameters and OutputParameters properties of IPluginExecutionContext. To understand the nature of this information, the relationship between an application making Web service calls and the context that a plug-in receives because of those calls must be described.

The following source code sample shows some typical calls to the Microsoft Dynamics CRM Web service.

[C#]
// Set up the CRM Service.
CrmService service = new CrmService();
service.Credentials = System.Net.CredentialCache.DefaultCredentials;

// Create the account object.
account account = new account();
account.name = "Fourth Coffee";

// Create the target object for the request.
TargetCreateAccount target = new TargetCreateAccount();
target.Account = account;

// Create the request object.
CreateRequest createRequest = new CreateRequest();
createRequest.Target = target;

// Execute the request.
CreateResponse createResponse = (CreateResponse)service.Execute(createRequest);
Guid accountID = createResponse.id;


Although this example uses Request/Response messages and the Execute method, you can use the other CrmService methods such as Create, Update, and Deleteto work with your business entities. The Microsoft Dynamics CRM system takes the information from those CrmService methods and transforms it intoRequest/Response messages that are processed by the event execution pipeline. The information on input/output parameters that follows still applies.

The following documentation relates the Web service calls in the example code to the context that a plug-in is passed. For the examples described herein, assume that a plug-in is registered to execute during the post-event of account creation so that the sample code causes the plug-in to execute.

Input Parameters


The InputParameters property bag contains all the information specified in the Request class whose message caused the plug-in to execute. The keys used to obtain values from the property bag are named according to the name of the Request class instance properties. An example of this is described next.

In the code sample, an account is created by using the CreateRequest class. The Target property of CreateRequest refers to a TargetCreateAccount object, which refers to an account object. This is shown in the following diagram.

CreateRequest and associated classes

When the plug-in is executed, the information that is in the Request object is passed to the plug-in in the InputParameters property of IPluginExecutionContext. For this example, the InputParameters property bag contains two key/value pairs. The first key is named "Target" and its associated value is the target of the request, namely the account object. The second key is named "OptionalParameters" and its associated value is the OptionalParameters instance property that is defined in the Request class from which CreateRequest is derived. In the sample code, no optional parameters were added to the CreateRequest, so that the optional parameters value in InputParameters is null.

The following figure shows an example plug-in that is being debugged in Visual Studio 2005.

Viewing the InputParameters property bag in a debugger

The figure shows the contents of the InputParameters property bag that has been passed in the context to the plug-in. Two key/value pairs are shown: Target andOptionalParameters.

The recommended way to specify these key names in code is to use the predefined names in the ParameterName class. For example, you can useParameterName.Target instead of "Target". Doing this reduces the possibility of a typing mistake in the key name when coding.

InputParameters contains Object types. Therefore, you must cast the property bag values to their appropriate types. The following sample plug-in code shows how to obtain the original account object.

[C#] DynamicEntity entity = (DynamicEntity)context.InputParameters.Properties[ParameterName.Target]

The account attributes can then be accessed in the plug-in.

[C#] string accountName = entity["name"]

Note The dynamic entity obtained from the InputParameters of the context contains only those attributes that are set to a value or null.

Output Parameters


For a post-event, the OutputParameters property bag contains the result of the core operation that is returned in the Response message. The key names that are used to access the values in the OutputParameters property bag match the names of the Response class instance properties.

CreateResponse class

In the source code example, the CreateResponse object contains the GUID of the new account instance after the Execute method is called. A post-event registered plug-in can obtain the GUID from the OutputParameters property bag by using the "id" key name or ParameterName.Id.

//[C#] 
Guid regardingobjectid = (Guid)context.OutputParameters[ParameterName.Id]

If a plug-in is registered for a pre-event, the OutputParameters property bag would not contain a value for the "id" key because the core operation would not yet have occurred.

CRM 2011 Visualizations

Visualizations - Charts


Visualizations - Dashboards

RemoveItemCampaign Message

Removes an item from a campaign.


//# The following code example shows how to use the RemoveItemCampaign message.

// Set up the CRM service.
CrmAuthenticationToken token = new CrmAuthenticationToken();
// You can use enums.cs from the SDK\Helpers folder to get the enumeration for Active Directory authentication.
token.AuthenticationType = 0;
token.OrganizationName = "AdventureWorksCycle";

CrmService service = new CrmService();
service.Url = "http://:/mscrmservices/2007/crmservice.asmx";
service.CrmAuthenticationTokenValue = token;
service.Credentials = System.Net.CredentialCache.DefaultCredentials;

// Create the request object.
RemoveItemCampaignRequest remove = new RemoveItemCampaignRequest();

// Set the ID of the campaign.
remove.CampaignId = new Guid("d7f33457-660e-de11-bf40-00155da4c706");

// Set the ID of the campaign item to remove.
remove.EntityId = new Guid("6e47aeb7-c30d-de11-bf40-00155da4c706");

// Execute the request.
RemoveItemCampaignResponse removed =
(RemoveItemCampaignResponse)service.Execute(remove);


RemoveMemberList Message

Removes a member from a list.


//# The following code example shows how to use the RemoveMemberList message.

// Set up the CRM service.
CrmAuthenticationToken token = new CrmAuthenticationToken();
// You can use enums.cs from the SDK\Helpers folder to get the enumeration for Active Directory authentication.
token.AuthenticationType = 0;
token.OrganizationName = "AdventureWorksCycle";

CrmService service = new CrmService();
service.Url = "http://:/mscrmservices/2007/crmservice.asmx";
service.CrmAuthenticationTokenValue = token;
service.Credentials = System.Net.CredentialCache.DefaultCredentials;

// Create the request object.
RemoveMemberListRequest remove = new RemoveMemberListRequest();

// Set the ID of the list.
remove.ListId = new Guid("18ECA720-493E-4800-BBFD-638BD54EB325");
// Set the ID of the list item to remove.
remove.EntityId = new Guid("2B951FBC-1C56-4430-B23B-20A1349068F3");

// Execute the request.
RemoveMemberListResponse removed = (RemoveMemberListResponse)service.Execute(remove);


Retrive Dynamic Entity based on Entity name & Guid


public DynamicEntity retriveEntity(string EntityName, string recordGuid)
{
TargetRetrieveDynamic targetRetrieve = new TargetRetrieveDynamic();

// Set the properties of the target.
targetRetrieve.EntityName = "contact";
targetRetrieve.EntityId = new Guid(rec_guid);

// Create the request object.
RetrieveRequest retrieve = new RetrieveRequest();

// Set the properties of the request object.
retrieve.Target = targetRetrieve;
retrieve.ColumnSet = new AllColumns();

// Indicate that the BusinessEntity should be retrieved as a DynamicEntity.
retrieve.ReturnDynamicEntities = true;

// Execute the request.
RetrieveResponse retrieved = (RetrieveResponse)_svc.Execute(retrieve);

// Extract the DynamicEntity from the request.
DynamicEntity R_entity = (DynamicEntity)retrieved.BusinessEntity;
return R_entity;
}


PublishXml Message

Publish the customizations for the specified entities.

   
//# The following code example shows how to use the PublishXml message.

// Set up the CRM service.
CrmAuthenticationToken token = new CrmAuthenticationToken();
// You can use enums.cs from the SDK\Helpers folder to get the enumeration for Active Directory authentication.
token.AuthenticationType = 0;
token.OrganizationName = "AdventureWorksCycle";

CrmService service = new CrmService();
service.Url = "http://:/mscrmservices/2007/crmservice.asmx";
service.CrmAuthenticationTokenValue = token;
service.Credentials = System.Net.CredentialCache.DefaultCredentials;

// Create the request.
PublishXmlRequest request = new PublishXmlRequest();

request.ParameterXml = @"<importexportxml>
<entities>
<entity>account</entity>
<entity>contact</entity>
</entities>
<nodes />
<securityroles />
<settings />
<workflows />
</importexportxml>";

// Execute the request.
PublishXmlResponse response = (PublishXmlResponse)service.Execute(request);


What is WCF RIA service?

WCF RIA service is a framework to develop n-tier application for Rich Internet Application (RIA). It is mainly used in RIA applications like Silverlight, AJAX client, etc. It solves the major problem while developing business application like decoupling the resource access, application logic and presentation layer. WCF RIA service was introduced in Silverlight 4 with .net framework 4, and it can be developed using visual studio2010.

Main problem developer are facing while developing the n-tier RIA application will be coordinating the application logic between middle tier and presentation tier. This problem will be solved by using WCF RIA service, it will synchronize the code between middle and presentation tier.

WCF RIA service will allow developer to write the set of service code and this server code will be available to the client side without manually duplicate that programming logic. RIA service client will be updated with business rule and entity present at the server side, when your recompile your project solution.

WCF RIA service will generate the code at the client side related to the service and domain entities declared at the server side.

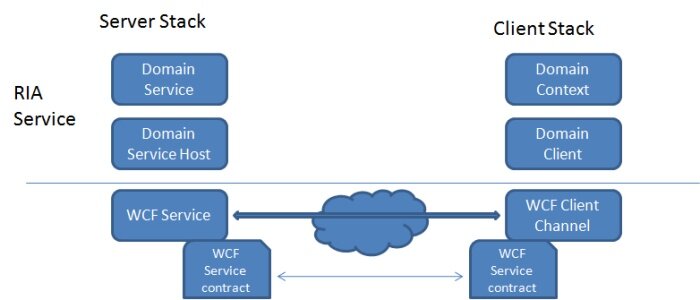
RIA service exposes the data from server side to client side using Domain service, RIA service framework implements the each domain service as WCF service to access the data as business entity.

  1. WCF RIA Domain Service

  2. Problems solved in RIA Service

  3. Query/Update process in RIA

  4. How to create Silverlight-WCF RIA service

fig: WCF RIA Serive architecture
WCF RIA Serive architecture


Domain Service

Domain services are WCF services that expose the business logic of a WCF RIA Services application. Domain service contains set of business related data operation and it is exposed as WCF service.

Below diagram explains integration of the RIA service with WCF

The DomainService class is the base class for all classes that serve as domain services.

  • DomainServiceHost is the hosting class for domain service; internally
  • DomainServiceHost uses the WCF ServiceHost class to host the application.

A domain service class must be marked with the EnableClientAccessAttribute attribute to make the service available to the client project. The EnableClientAccessAttributeattribute is automatically applied to a domain service when you select the Enable client access check box in the Add New Domain Service Class dialog box. When the EnableClientAccessAttribute attribute is applied to a domain service, RIA Services generates the corresponding classes for the client project.

   1:  //Example:
   2:   [EnableClientAccess()]
   3:      public class EmployeeDomainService : DomainService
   4:      {
   5:          private EmployeeData data = EmployeeData.Instance;
   6:   
   7:          public IEnumerable < Employee> GetEmployees()
   8:          {
   9:              return data.EmployeeList;
  10:          }
  11:      }
  12:   


DomainContext class at the client side is used to consume the Domain service by using DomainClient object. DomainContext class available inside the name space "System.ServiceModel.DomainServices.Client"

fig: WCF RIA Domain Serive architecture
WCF RIA Domain Serive


Problem solved in RIA


  1. To have best performance of the RIA application, app logic need to be available in client and server side. This problem is solved by auto generating the code at the client side while recompiling the project.
  2. Asynchronous call – Asynch service call are supported in Domain service by using WCF infrastructure
  3. Handling large data and data across different tier – Large amount of data can be access and filter using IQueryable object. Since entity objects used in domain service are serializable and so it can be access across different layer
  4. Security/Access control – ASP.Net membership frameworks are integrated with RIA service to provide security systems to RIA service
  5. Validation – Entity can be validated based using adding attribute to the class members

   1:  //Example:
   2:    public class Member
   3:      {
   4:          [Key]
   5:          public int MemberId { get; set; }
   6:   
   7:   
   8:          public string Fname { get; set; }
   9:   
  10:          [Required]
  11:          public string Lname { get; set; }
  12:   
  13:          public DateTime JoinDate { get; set; }
  14:   
  15:          [Range(30,90, ErrorMessage="sorry, you are either too young or too old for our club!")]
  16:          public int Age { get; set; }
  17:      }


Querying/Updating data in RIA Service


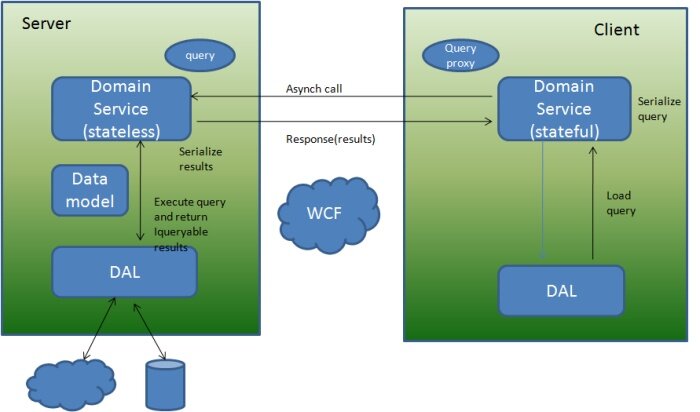
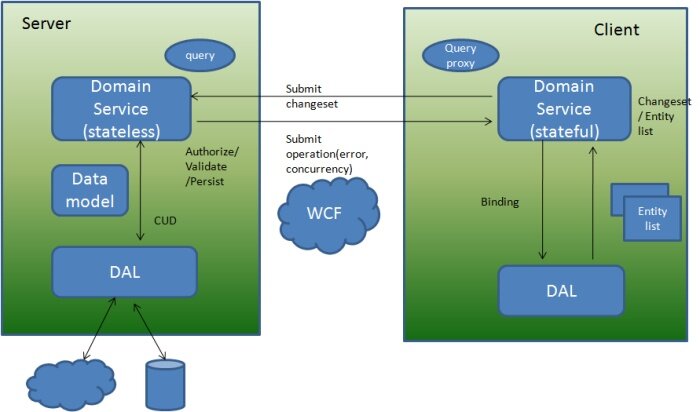
The below diagram are self explanatory to discuss about the querying or updating the data using RIA service

fig: WCF RIA to Query data


fig: WCF RIA to update data


How to Create WCF RIA Service


Download:
Silverlight_WCF_RIA_Service.zip

Let us understand more about the WCF RIA service by creating Silverlight client application which read and updated the Employee details from WCF RIA Service.

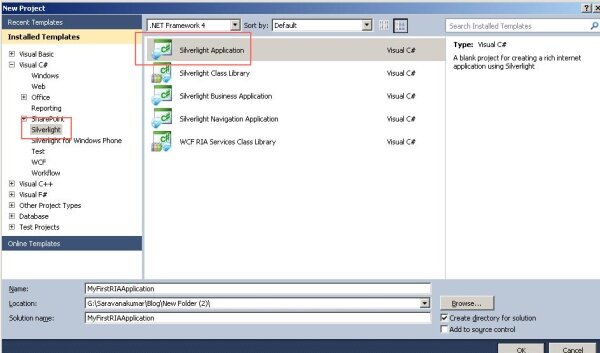
Step 1:Start the Visual Studio 2010 and click File -> New-> Project. Enter the project name and click “Create”

Project creation

Step 2:Select “Enable WCF RIA Services”. This will make your Silverlight application to user WCF RIA service

Select RIA service

Step 3:Create “Data” folder and add DataModel” class as shown below. This is the data class which will return list of Employee and update the employee list

Data Model class:


   1:  public class Employee
   2:      {
   3:          [Key]
   4:          public int EmpId { get; set; }
   5:          public string Fname { get; set; }
   6:          public string Lname { get; set; }
   7:          public DateTime JoinDate { get; set; }
   8:          public int Age { get; set; }
   9:      }
  10:   
  11:   
  12:      public partial class EmployeeData
  13:      {
  14:          private static readonly EmployeeData _instance = new EmployeeData();
  15:          private EmployeeData() { }
  16:          public static EmployeeData Instance
  17:          {
  18:              get
  19:              {
  20:                  return _instance;
  21:              }
  22:          }
  23:   
  24:   
  25:          private List < Employee > empList = new List < Employee>()
  26:          {
  27:              new Employee() { EmpId  = 1, Fname = "Sam", Lname = "kumar", 
  28:                              JoinDate=new DateTime(2010,7, 21), Age=30},
  29:              new Employee() { EmpId = 2, Fname = "Ram", Lname = "kumar", 
  30:                              JoinDate=new DateTime(2009,6,8), Age=35},    
  31:              new Employee() { EmpId = 3, Fname = "Sasi", Lname = "M", 
  32:                              JoinDate=new DateTime(2008,3,5), Age=39},  
  33:              new Employee() { EmpId = 4, Fname = "Praveen", Lname = "KR", 
  34:                              JoinDate=new DateTime(2010, 5,1), Age=56},
  35:              new Employee() { EmpId = 5, Fname = "Sathish", Lname = "V", 
  36:                              JoinDate = new DateTime(2006,12,15), Age=72},  
  37:              new Employee() { EmpId = 6, Fname = "Rosh", Lname = "A", 
  38:                              JoinDate=new DateTime(2009,2,2), Age=25}
  39:          };
  40:   
  41:          public IEnumerable< Employee > EmployeeList
  42:          {
  43:              get
  44:              {
  45:                  return empList;
  46:              }
  47:          }
  48:   
  49:   
  50:          public void Update(Employee updEmployee)
  51:          {
  52:              Employee existing = empList.Find(p => p.EmpId == updEmployee.EmpId);
  53:              if (existing == null)
  54:                  throw new KeyNotFoundException("Specified Employee cannot be found");
  55:   
  56:              existing.Fname = updEmployee.Fname;
  57:              existing.Lname = updEmployee.Lname;
  58:              existing.JoinDate = updEmployee.JoinDate;
  59:              existing.Age = updEmployee.Age;
  60:          }
  61:      }


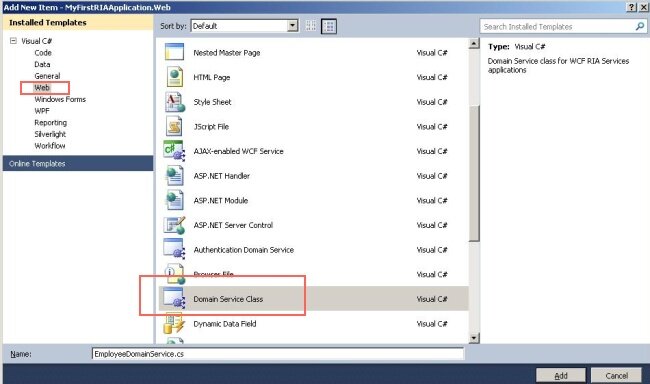
Step 4:To expose the Employee related operation to the client side, Create domain service class. By right click project file and select Add new item.

Create Domain Service

Step 5:Add code to return the Employee list

Domain Service class:


   1:  // TODO: Create methods containing your application logic.
   2:      [EnableClientAccess()]
   3:      public class EmployeeDomainService : DomainService
   4:      {
   5:          //Create instance of the Data access layer
   6:          private EmployeeData data = EmployeeData.Instance;
   7:   
   8:          public IEnumerable< Employee> GetEmployee()
   9:          {
  10:              return data.EmployeeList ;
  11:          }
  12:   
  13:          public void UpdateEmployee(Employee emp)
  14:          {
  15:              data.Update(emp);
  16:          }
  17:      }


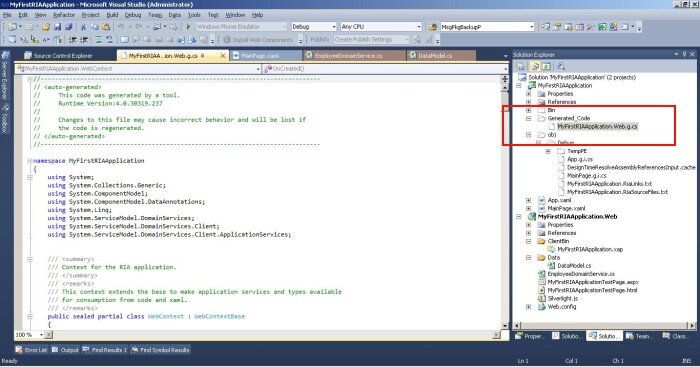
Step 6:Compile the solution – After compilation RIA service will generate the application logic at the client side using DomainContext object. Enable show all files option for the solution and view the auto generated code.

Auto generated code

Step 7:View the DomainContext class are created at the client side.

Domain Context class at client:


   1:   /// 
   2:      /// The DomainContext corresponding to the 'EmployeeDomainService' DomainService.
   3:      /// 
   4:      public sealed partial class EmployeeDomainContext : DomainContext
   5:      {
   6:          
   7:          #region Extensibility Method Definitions
   8:   
   9:          /// 
  10:          /// This method is invoked from the constructor once initialization is complete and
  11:          /// can be used for further object setup.
  12:          /// 
  13:          partial void OnCreated();
  14:   
  15:          #endregion
  16:          
  17:          
  18:          /// 
  19:          /// Initializes a new instance of the < see cref="EmployeeDomainContext"/> class.
  20:          /// 
  21:          public EmployeeDomainContext() : 
  22:                  this(new WebDomainClient< IEmployeeDomainServiceContract>(new 
  23:                                Uri("MyFirstRIAApplication-Web-EmployeeDomainService.svc", 
  24:                                                          UriKind.Relative)))
  25:          {
  26:          }
  27:   
  28:          ........
  29:          ........


Step 8:Add DataGrid to Main.xaml file to display the employee details query from DataModel and add two buttons to update and reject the data changed from client side.


Main.xaml

 < Grid x:Name="LayoutRoot" Background="White">
        < StackPanel Orientation="Vertical" HorizontalAlignment="Left"  >
        < sdk:DataGrid x:Name="EmployeeGrid" AutoGenerateColumns="True"  
                        RowEditEnded="EmployeeGrid_RowEditEnded" />
            < Button Content="Accept" Height="23" Name="btnAccept" 
                        Width="75" Margin="5" Click="btnAccept_Click"  />
            < Button Content="Reject" Height="23" Name="btnReject" 
                        Width="75" Margin="5" Click="btnReject_Click"/>
        </StackPanel>
    </Grid>


Main.xaml.vb

   1:  public partial class MainPage : UserControl
   2:      {
   3:          //create instance of Doman context class
   4:          EmployeeDomainContext ctx = new EmployeeDomainContext();
   5:   
   6:          public MainPage()
   7:          {
   8:              InitializeComponent();
   9:              //Load query data , Read data from DAL layer to UI
  10:              EntityQuery< Employee> query = ctx.GetEmployeeQuery();
  11:              LoadOperation< Employee> lo = ctx.Load< Employee>(query);
  12:              EmployeeGrid.ItemsSource = lo.Entities;
  13:          }
  14:   
  15:          private void EmployeeGrid_RowEditEnded(object sender, 
  16:                                  DataGridRowEditEndedEventArgs e)
  17:          {
  18:   
  19:          }
  20:   
  21:          private void btnAccept_Click(object sender, RoutedEventArgs e)
  22:          {
  23:              //Update the DAL with user changes
  24:              ctx.SubmitChanges();
  25:          }
  26:   
  27:          private void btnReject_Click(object sender, RoutedEventArgs e)
  28:          {
  29:              //Roll back the user changes
  30:              ctx.RejectChanges();
  31:          }
  32:      }


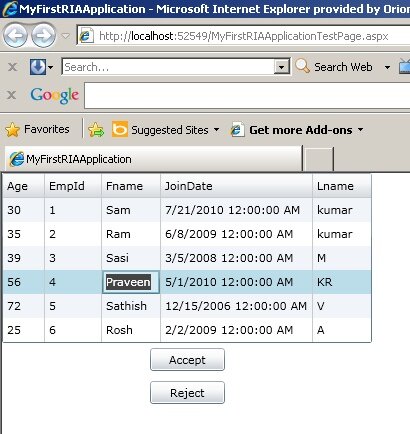
Step 9:Run the application and see the output as shown below

RIA service output

CRM 2011 UX Extensibility

UX Extensibility - Intro


UX Extensibility - WebResources


UX Extensibility - Client Scripting


UX Extensibility - Filtered Lookups

Convert a Fax to a Task

This sample code shows how to convert a fax to a task. The code first creates an incoming Fax activity, and then converts it to a Follow-up Task with a due date a week after it was received.


[C#]
using System;
using Microsoft.Crm.Sdk.Utility;

namespace Microsoft.Crm.Sdk.HowTo
{
// Microsoft Dynamics CRM namespaces.
using CrmSdk;

///
/// This sample shows how to convert a fax into a task.
///

public class ConvertFaxToTask
{
static void Main(string[] args)
{
// TODO: Change the server URL and organization to match your Microsoft Dynamics CRM server and Microsoft Dynamics CRM organization.
ConvertFaxToTask.Run("http://localhost:5555", "CRM_Organization");
}

public static bool Run(string crmServerUrl, string orgName)
{
#region Setup Data Required for this sample.

bool success = false;

#endregion

try
{
// Set up the CRM service.
CrmService service = CrmServiceUtility.GetCrmService(crmServerUrl, orgName);
service.PreAuthenticate = true;

// Get the current user.
WhoAmIRequest userRequest = new WhoAmIRequest();
WhoAmIResponse user = (WhoAmIResponse)service.Execute(userRequest);

// Create the fax object.
fax fax = new fax();

// Set the properties of the fax.
fax.subject = "Test Fax";
fax.description = "New Fax";

// Create the party sending and receiving the fax.
activityparty party = new activityparty();

// Set the properties of the activity party.
party.partyid = new Lookup();
party.partyid.type = EntityName.systemuser.ToString();
party.partyid.Value = user.UserId;

// The party sends and receives the fax.
fax.from = new activityparty[] { party };
fax.to = new activityparty[] { party };

// Create the fax.
Guid createdFaxId = service.Create(fax);

// Retrieve the created fax.
// Be aware that using AllColumns may adversely affect
// performance and cause unwanted cascading in subsequent
// updates. A best practice is to retrieve the least amount of
// data required.
fax newFax = (fax)service.Retrieve(EntityName.fax.ToString(), createdFaxId, new AllColumns());

// Create the task object.
task task = new task();

// Set the properties of the task.
task.subject = "Follow Up: " + newFax.subject;

// Set the due date of the task.
task.scheduledend = new CrmDateTime();

// Get the date that the fax was received.
CrmDateTime endDate = newFax.createdon;

// Set the due date of the task to one week later.
task.scheduledend.Value = endDate.UniversalTime.AddDays(7).ToString();

// Create the task.
Guid createdTaskId = service.Create(task);

#region check success

if (createdTaskId != Guid.Empty)
{
success = true;
}

#endregion

#region Remove Data Required for this Sample

service.Delete(EntityName.fax.ToString(), createdFaxId);
service.Delete(EntityName.task.ToString(), createdTaskId);

#endregion
}
catch (System.Web.Services.Protocols.SoapException)
{
// Add your error handling code here.
}

return success;
}
}
}


Merge Message

Merges the information from two entity instances of the same type.


//# The following code example shows how to use the Merge message.

// Set up the CRM service.
CrmAuthenticationToken token = new CrmAuthenticationToken();
// You can use enums.cs from the SDK\Helpers folder to get the enumeration for Active Directory authentication.
token.AuthenticationType = 0;
token.OrganizationName = "AdventureWorksCycle";

CrmService service = new CrmService();
service.Url = "http://:/mscrmservices/2007/crmservice.asmx";
service.CrmAuthenticationTokenValue = token;
service.Credentials = System.Net.CredentialCache.DefaultCredentials;

// Create the target for the request.
TargetMergeAccount target = new TargetMergeAccount();
// EntityId is the GUID of the account that is being merged into.
target.EntityId = new Guid("2B951FBC-1C56-4430-B23B-20A1349068F3");

// Create the request.
MergeRequest merge = new MergeRequest();
// SubordinateId is the GUID of the account merging.
merge.SubordinateId = new Guid("AD618DB2-F0DB-4A6A-8C4B-2F2213EAA38E");
merge.Target = target;
merge.PerformParentingChecks = false;

account updateContent = new account();
updateContent.address1_line1 = "test";
merge.UpdateContent = updateContent;


// Execute the request.
MergeResponse merged = (MergeResponse)service.Execute(merge);