In this article, will be explaining the common and mostly used web.config tags, their different sections and also discuss about securing the the config file.
Introduction
Here in this article, I will be exploring the configuration files of a website. ASP.NET website configuration is normally a combination of two files:
- machine.config
- web.config
Here, I'll concentrate on web.config and give an overview of machine.config.
Every time we install the .NET framework, there is a machine.config file that is created in "C:\WINDOWS\Microsoft.NET\Framework\[Version]\CONFIG", which mainly defines:
- Supported configuration file sections,
- the ASP.NET worker process configuration, and
- registers different providers that are used for advanced features such as profiles, membership, and role based security.
To explore the web.config might take a book, but here, I'll try to explore all the important sections that play a pivotal role for an ASP.NET website and its deployment.
Every web application inherits settings from the machine.config file, and application level setting is done in the web.config file. We can also override configurations in the machine.config file in the web.config file. But, a few settings can not be overridden because certain settings are process model settings and can't be changed on a per application basis.
The entire contents of a configuration file, whether it is machine.config or web.config, is nested in a <configuration> element.
ASP.NET 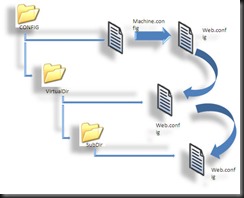
ASP.NET uses a multilayered configuration system that allows for using different settings for different parts of an application. For this, we must have an additional subdirectory inside the virtual directory, and these subdirectories will contain their own config files with additional settings. ASP.NET uses configuration inheritance so that each subdirectory acquires the settings from the parent directory.
Let's take an example. We have a web request http://localhost/X/Y/Z/page.aspx, where X is the root directory of the application. In this case, multiple levels of settings come into the picture.
- The default machine.config settings are applied first.
- Next, the web.config of the root level is applied. This web.config resides in the same config directory as the machine.config file.
- Now, if there is any config file in the application root X, these settings are applied.
- If there is any config file in the sub directory Y, these settings are now applied.
- If there is any config file in the application root Z, those settings are then applied.
But here, there is a limitation: we can have unlimited number of subdirectories having different settings, but the configuration at step 1 and 2 are more significant because some of the settings can not be overridden, like the Windows account that is to be used to execute the code, and other settings can be only overridden at the application root level, like the type of authentication to be used etc.
Different config files are useful when we apply different security settings to different folders. The files that need to be secured would then be placed in a separate folder with a separate web.config file that defines the more stringent security settings to these files and vice versa.
In the web.config, under the <configuration> element, there is another element <system.web>, which is used for ASP.NET settings and contains separate elements for each aspect of the configuration.
Important Configuration Tags
There are a lot of configuration tags that are provided by the web.config file, like authentication, authorization, browserCaps, clientTarget etc., but all of these don't have that much importance (and also can't be covered in a single article ), so here, I have only concentrated on the main tags of the config file.
<authentication>
This element is used to verify the client's identity when the client requests a page from the server. This is set at the application level. We have four types of authentication modes: “None”, “Windows”, “Forms”, and “Passport”.
If we don't need any authentication, this is the setting we use:
<authentication mode="None"/>
Normally, Windows authentication is used, for which, we need to check the checkbox: Integrated Windows Authentication.
<authentication mode="Windows"/>
This authentication is handled by IIS. When the user sends a request to the server, IIS authenticates it and sends the authentication identity to the code.

IIS gives us four choices for the authentication modes: Anonymous, Basic, Digest, and Windows Integrated. If the user selects Anonymous, then IIS doesn't perform any authentication. For Basic authentication, the user has to provide a username and password. This authentication is very unsecure, because the user credentials are sent in clear text format over the network. Digest authentication is same as Basic, except it hashes the user's password and transmits the hashed version over the wire. So, it is more secure than Basic. For Windows Integrated authentication, passwords never cross the network. The user must still have a username and password, but the application uses either the Kerberos or a challenge/response protocol to authenticate the user.
Forms authentication uses web application forms to collect user credentials, and on the basis of the credential, it takes action on a web application.
<authentication mode="Forms">
<forms name="Form" loginUrl="index.asp" />
</authentication>
Passport authentication is provided by Microsoft. A redirect URL should be specified, and is used when the requested page is not authenticated, and then it redirects to this URL.
<authentication mode="Passport">
<passport redirectUrl="internal" />
</authentication>
Here, users are authenticated using the information in Microsoft's Passport database. The advantage is, we can use existing user credentials (such as an email address and password) without forcing users to go through a separate registration process. The disadvantage is we need to go through the licensing agreement with Microsoft and pay a yearly fee based on the use.
For using Passport authentication, you first install the Passport Software Development Kit (SDK) on your server. The SDK can be downloaded from here. It includes full details of implementing passport authentication in your own applications.
<authorization>
The <authorization> tag controls client access to web page resources. This element can be declared at any level (machine, site, application, subdirectory, or page).
<authorization>
<allow users="comma-separated list of users"
roles="comma-separated list of roles"
verbs="comma-separated list of verbs"/>
<deny users="comma-separated list of users"
roles="comma-separated list of roles"
verbs="comma-separated list of verbs"/>
</authorization>
<allow> : Using this tag, we can control access to resources on the basis of the following verbs. In these attributes, we use symbols: ? and *.? means for anonymous users/resources, and * means for all users.
- users: This contains the list of user names (comma separated) that are allowed to access the resources.
- roles: This contains the list of roles (comma separated) that are allowed to access the resources.
- verbs: This contains the list of HTTP verbs to which the action applies (comma separated). It is used to create a rule that applies to a specific type of HTTP request (GET, POST, HEAD, OR DEBUG).
<deny> : Using this tag, we can control access to resources on the basis of the following verbs:
- users: This contains the list of users names (comma separated) that are denied access to the resources.
- roles: This contains the list of roles (comma separated) that are denied access to the resources.
- verbs: This contains the list of HTTP verbs to which the action applies (comma separated). It is used to create a rule that applies to a specific type of HTTP request (GET, POST, HEAD, OR DEBUG).
<compilation>
In this section, we can configure the settings of the compiler. Here, we can have lots of attributes, but the most common ones are debug and defaultLanguage. Setting debug to true means we want the debugging information in the browser, but it has a performance tradeoff, so normally, it is set as false. And, defaultLanguage tells ASP.NET which language compiler to use: VB or C#.
<customErrors>
This tags includes the error settings for the application, and is used to give custom error pages (user-friendly error pages) to end users. In the case that an error occurs, the website is redirected to the default URL. For enabling and disabling custom errors, we need to specify the mode attribute.
<customErrors defaultRedirect="url" mode="Off">
<error statusCode="403" redirect="/accesdenied.html" />
<error statusCode="404" redirect="/pagenotfound.html" />
</customErrors>
- "On" means this settings is on, and if there is any error, the website is redirected to the default URL.
- "Off" means the custom errors are disabled.
- "RemoteOnly" shows that custom errors will be shown to remote clients only.
<error statusCode="403" redirect="/accesdenied.html" />
<error statusCode="404" redirect="/pagenotfound.html" />
This means if there is an error of 403, then the website will redirected to the custom page accessdenied.html. Similarly for 404 as defined above.
Note: If an error occurs in the custom error page itself, ASP.NET won't able to handle it. It won't try to reforward the user to the same page. Instead, it'll show the normal default client error page with a generic message.
<globalization>
This section is used when we want to use encoding or specify a culture for the application. This is a very vast topic, and can take an article itself for explaining it. Here, we define the character set for the server to send the response to the client, which is by default is UTF-8, and the settings of which the server should use to interpret and display culturally specific strings, such as numbers and dates.
<globalization requestEncoding="utf-8" responseEncoding="utf-8" />
<httpRuntime>
This section can be used to configure the general runtime settings of the application. The main two are:
<httpRuntime appRequestQueueLimit="50" executionTimeout="300" />
As the name suggests, the attribute appRequestQueueLimit defines the number of requests that can be queued up on the server for processing. If there are 51 or more requests, then server would return the 503 error ("Server too busy").
The attribute executionTimeout defines the number of minutes ASP.NET will process a request before it gets timeout.
<trace>
As the name suggestz, it is used for tracing the execution of an application. We have here two levels of tracing: page level and application level. Application level enables the trace log of the execution of every page available in the application. IfpageOutput="true", trace information will be displayed at the bottom of each page. Else, we can view the trace log in the application root folder, under the name trace.axd.
<trace enabled="false" requestLimit="10" pageOutput="false"
traceMode="SortByTime" locaOnly="true" />
Set the attribute localOnly to false for not viewing the trace information from the client.
For enabling trace at page level, set Trace="True" in the Page tag (on the top of the page).
<identity>
Using this tag, we can control the identity of the application. By default, Impersonation is disabled. Using Impersonation, an ASP.NET application can execute optionally with the identity of a client on whose behalf they are operating.
<identity impersonate="false" userName="domain\username" password="password" />
<sessionState>
In this section, we tell ASP.NET where to store the session. By default, it's inproc which means storing the session values on the server. But we have four options:
- "Off" means session is not enabled for the application.
- "inproc" means storing the session values on the server.
- "StateServer" means session states are stored in a remote server.
- "SQLServer" means session states are stored in a SQL Server database. For this, we need to install the InstallSQLState.sql script in the SQL Server database. It is mainly used when the we use web farms (an application deployed on multiple servers), but it makes the performance slow as compared to "inproc".
Here are the other settings:
- "cookieless": when it is true, it means the session used is without cookies.
- “timeout” specifies after how much time the session would expire if the application is not accessed during that period.
- "stateConnectionString" needs to be specified when the session mode is StateServer.
- "sqlConnectionString" is the connection string of the SQL Server database if the session mode is sqlserver.
- "stateNetworkTimeout" attribute, when using the StateServer mode to store session state, specifies the number of seconds the TCP/IP network connection between the web server and the state server can be idle before the session is abandoned. The default is 10.
<sessionState mode="Off"
cookieless="true"
timeout="100"
stateConnectionString="tcpip=server:port"
sqlConnectionString="sql connection string"
stateNetworkTimeout="number of seconds"/>
<appSettings>
This section is used to store custom application configuration like database connection strings, file paths etc. This also can be used for custom application-wide constants to store information over multiple pages. It is based on the requirements of the application.
<appSettings>
<add key="Emailto" value="me@microsoft.com" />
<add key="cssFile" value="CSS/text.css" />
</appSettings>
It can be accessed from code like:
ConfigurationSettings.AppSettings("Emailto");
All the values returned from it are strings.
Custom Configuration Sections
We might need some custom configuration sections based on the requirements. One of the simplest ways we can do this is to create our own named sections, and we can use existing NameValueSectionHandler components to parse them, and they can be used as key/value pairs to be accessed at run-time.

This can be read very easily accessed from the code-behind as:
private string ReadCustomSection()
{
string strKey = "mySectionKey1";
NameValueCollection nvcmySection = (NameValueCollection)
ConfigurationSettings.GetConfig("mySection");
string strValueofKey = nvcmySection[strKey];
return strValueofKey;
}
There are more ways for using custom configuration sections. Check this article: CustomConfigurationSection.
Encrypting Configuration Sections
Some times, we put some sensitive data in the web.config file like connection strings, user specific details etc. It is recommended to encrypt these sections. ASP.NET supports two encryption techniques.
The way the operations perform is very simple. When retrieving information from a config file, ASP.NET automatically decrypts it and gives the plain text to the code. Similarly, if we do any updates on the config file from code, it is done the same way. We cannot update a config file directly. But, we can use WAT for updating it.
Programmatic encryption techniques: If we want to do encryption programmatically, then we need to retrieve the corresponding ConfigurationSection.SectionInformation object and call the ProtectSection() method. If we want to decrypt a section, then we can call the method UnprotectSetion(). Sample code is shown here:
Configuration myConfig =
WebConfigurationManager.OpenWebConfiguration(Request.ApplicationPath);
ConfigurationSection mySettings = myConfig.GetSection("mySection");
if (mySettings.SectionInformation.IsProtected)
{
mySettings.SectionInformation.UnprotectSection();
}
else
{
mySettings.SectionInformation.ProtectSection("DataProtectionConfigurationProvider"); ;
}
myConfig.Save();
Command line utilities: We can also use a command line utility like aspnet_regiis.exe for encryption of a config file, which is a CAB file found in C:\[WinDir]\Microsoft.NET\Framework\[Version]. For using this tool, we must create a virtual directory for the application. You can refer my article, Deploying Website at IIS, for more information.
When using aspnet_regiis to protect some sections of a config file, we need to specify some command line arguments such as:
- The -pe switch specifies the configuration section to encrypt.
- The -app switch specifies our web application virtual path.
- The -prov switch specifies the provider name.
Here is the command line for an application located at http://localhost/MyApp:

A Few Important Points
- Some settings can not be encrypted because they are used outside ASP.NET (mainly by the IIS web server), like <httpruntime>.
- Config files are case sensitive.
- The web.config file is protected by IIS, so it won't be accessible by a client system. So, if a user tries to access it, anaccess denied message will be shown.
- If we change the config file at the server, we don't need to restart the web server because IIS monitors the changes in the web.config, and for performance measures, it cache it.
- Microsoft also provides a tool known as Website Administration Tool (WAT) that lets us configure various part of the web.config using a web interface. To run it, select Website


